
How to Use a Dash Cam Step-by-Step Guide for 2026
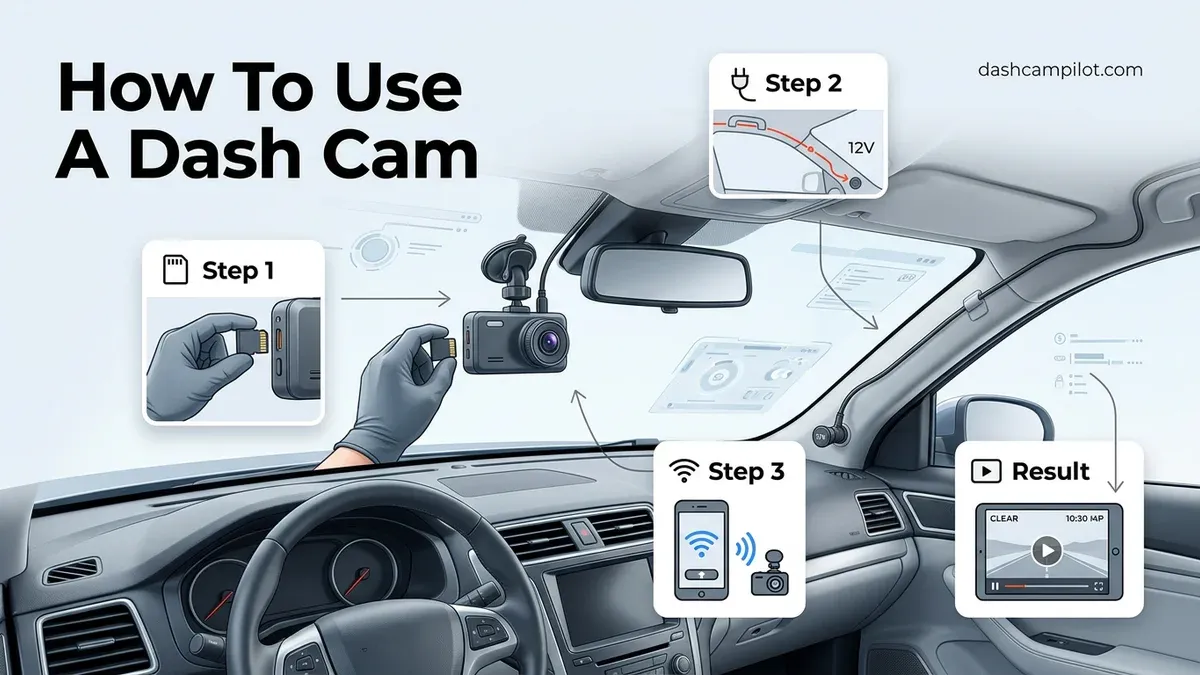
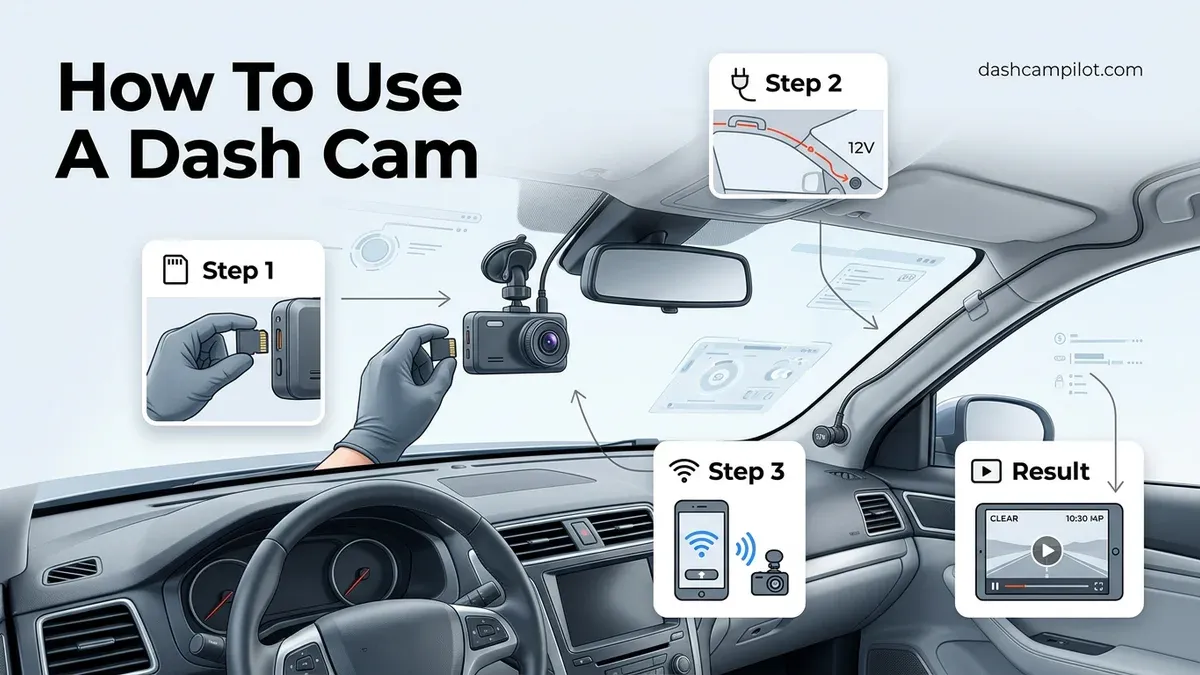
Operating a dash cam properly comes down to three essentials: mounting the lens where it captures the road without blocking safety sensors, tucking your power cable securely behind interior trim, and confirming that auto-recording triggers every time your engine starts. When configured correctly, modern dash cams require zero daily interaction. They power up automatically, loop footage seamlessly, and lock critical incident files when their internal sensors detect an impact.
Getting your physical setup right from the start protects you from the most common post-accident disaster: realizing your camera shut down weeks ago due to a loose plug or a corrupted memory card. Taking twenty minutes to install the hardware properly ensures you have clear, timestamped video evidence ready when an insurance dispute or road incident occurs.
Key Takeaways
- Mount the camera directly behind the rearview mirror to keep your windshield view unobstructed.
- Format your microSD card inside the dash cam menus before recording your first drive.
- Enable loop recording in 3-minute increments to optimize memory management and clip retrieval.
- Set G-sensor sensitivity to medium or low to prevent false emergency file locks.
- Review and reformat the microSD card once a month to prevent file corruption.
What Causes Dash Cam Errors and Common Setup Failures
Most dash cam issues are not hardware defects. They are installation and media errors that prevent the unit from saving video reliably during daily driving.

Memory Card Bottlenecks and Write Failures
Modern dash cams record high-bitrate 4K or multi-channel video, which places extreme stress on storage media. Standard consumer microSD cards quickly overheat and fail under continuous loop recording. To avoid frozen screens, dropped frames, or boot loops, choose the right card architecture:
- Buy High Endurance cards: Look for cards labeled "High Endurance" or "Max Endurance" built with durable NAND flash memory designed for non-stop overwriting.
- Verify speed ratings: Use at least a U3, V30, or A2 rated card. Standard Class 10 cards cannot handle the data stream of 2026 multi-lens setups.
- Format directly in-camera: Always format the card using the dash cam's internal menu rather than your computer. This writes the camera's proprietary folder structure cleanly.
Power Port Confusion and Sensor Obstruction
Another frequent failure involves power sources. Many modern vehicles feature accessory 12V sockets or USB ports that remain hot 24/7. If you plug into a continuous-power port without a low-voltage cutoff, your camera will drain your car battery overnight. Conversely, plugging into data-only USB ports often delivers insufficient amperage (under 1.5A), causing the dash cam to reboot randomly while driving.
Placement errors also ruin footage. Mounting the camera outside the physical reach of your windshield wipers leaves your lens blinded during rain or snow. Similarly, placing it directly in front of your vehicle's Advanced Driver Assistance Systems (ADAS) sensor cluster behind the rearview mirror can interfere with automatic emergency braking and lane-keeping cameras.
How to Use a Dash Cam Like a Pro: A Practical Walkthrough
Operating a dashboard camera involves far more than simply sticking a lens to your glass and driving away. To ensure your camera captures undeniable evidence during traffic incidents, resists extreme thermal shifts, and records continuously without data corruption, you need an exact operational workflow. This comprehensive walkthrough guides you through hardware preparation, tactical positioning, optimal software calibration, and routine file management to maximize your driving security.
Step 1: Select and Format an Endurance MicroSD Card
What you need: A High-Endurance Class 10 / U3 / V30 MicroSD card (64GB to 256GB recommended) and your dash cam unit.
Instructions: Dash cams write data continuously, which will rapidly destroy standard consumer memory cards. Insert a dedicated "High Endurance" card into the camera's card slot until it clicks into place. Power the device using the supplied cable. Navigate through the on-screen menu or mobile companion app to find the "Format SD Card" option. Initiate the in-camera format sequence. This structures the storage block architecture specifically for your camera’s proprietary file-looping algorithm and clears existing partition tables to prevent recording write-errors.
Pro Tip: Never format your memory card solely on a Windows or Mac computer; always perform the final format inside the dash cam itself to establish the device-specific file allocation table.
Step 2: Position the Mount Within the Wiper Sweep Zone
What you need: Rubbing alcohol (70% isopropyl), microfiber cloth, and the camera’s electrostatic sticker or adhesive bracket.
Instructions: Clean a 6-by-6-inch area of your windshield directly behind the rearview mirror using isopropyl alcohol to eliminate oils and off-gassing residue. Sit in the driver’s seat to verify that the camera body remains visually concealed behind the mirror housing to comply with windshield obstruction laws. Crucially, check from the outside to confirm the lens sits within the swept path of your windshield wipers. Peel the backing off the high-bond adhesive mount, align it level with the horizon, and press firmly against the glass for 30 seconds.
Pro Tip: Mount the camera slightly toward the passenger side of the rearview mirror stalk; this maintains an unhindered driver sightline while keeping the lens centered along the vehicle’s longitudinal axis.
Step 3: Route and Conceal the Power Cable Safely
What you need: Plastic trim removal tool, cable routing clips, and the included 12V power adapter cable (typically 11.5 to 15 feet long).
Instructions: Connect the power cable to the camera. Using the plastic trim tool, gently press the wire into the gap where the headliner meets the top of the windshield, working across to the passenger-side A-pillar. Route the wire around the front of the A-pillar rather than crossing over the seam where side-curtain airbags deploy. Pull down the rubber door weatherstripping, run the wire down the door frame toward the footwell, guide it beneath the passenger glove compartment, and plug the adapter into your vehicle’s 12V auxiliary power port or direct USB power feed.
Pro Tip: Never allow the power cable to drape across the side-curtain airbag deployment seam located on the A-pillar; an improper crossover can turn your cable into a high-speed projectile during a collision.
Step 4: Calibrate Horizon Alignment and Field of View
What you need: A level parking surface and the camera’s live LCD display or paired smartphone Wi-Fi stream.
Instructions: Park your car on a completely flat, horizontal surface facing an open street or wall. Power on the camera and observe the live video feed. Loosen the mount pivot screw and tilt the lens until the frame composition adheres strictly to the "50/50 rule": 50% sky and 50% road across the horizontal center line. An excessive amount of sky forces the camera’s dynamic light sensor to underexpose dark roadways and license plates, while tilting too far down introduces glare from your vehicle's dashboard reflection.
Pro Tip: If your vehicle features a steeply raked dashboard, install a circular polarizing lens (CPL) filter onto the dash cam optic to eliminate distracting glass reflections during midday sun.
Step 5: Configure Video Resolution, Loop Intervals, and G-Sensor
What you need: The dash cam configuration menu accessible via physical interface buttons or smartphone app.
Instructions: Set video resolution to the highest native parameter (e.g., 4K at 30fps or 1440p at 60fps) with High Dynamic Range (HDR) or Wide Dynamic Range (WDR) enabled. Select a loop recording interval of 3 minutes; this duration balances manageable file transfer sizes with continuous recording reliability. Next, adjust the internal G-sensor (impact detector) to "Low" or "Medium" sensitivity. Setting the G-sensor to "High" will cause minor road bumps, railway crossings, and potholes to falsely trigger emergency write-locks, quickly filling your storage card with undeletable files.
Pro Tip: Enable the internal audio recording feature; vocalizing license plate numbers out loud during hit-and-run scenarios provides crucial evidence even if the vehicle speeds out of optical range.
Step 6: Master Daily Operation and Emergency Event Tagging
What you need: Awareness of the manual emergency lock button and status LED indicators.
Instructions: When wired to a standard switched accessory outlet, your dash cam will emit a start chime and begin recording automatically within 5 to 10 seconds of starting your engine. Develop the habit of glancing at the operational LED to confirm a steady blinking red or green light, which indicates an active write cycle. In the event of a close call, road rage encounter, or collision that does not automatically trigger the impact sensor, press the dedicated manual "Emergency / Lock" button immediately. This moves the active 3-minute clip into a protected storage folder that cannot be overwritten by regular loop cycles.
Pro Tip: Review your dash cam's chime signatures in the user manual; cameras emit distinct tone sequences for normal power-up versus memory card write failures.
Step 7: Retrieve, Archive, and Manage Video Files
What you need: A USB MicroSD card reader, laptop/desktop computer, or direct Wi-Fi sync app on a smartphone.
Instructions: For rapid sharing with law enforcement roadside, connect to the dash cam's local Wi-Fi network using its proprietary mobile app and download the locked incident clip directly to your phone's camera roll. For thorough legal preservation, power down your car, remove the MicroSD card, and plug it into a computer via a high-speed card reader. Locate the "RO" (Read-Only) or "Event" directory. Copy the raw MP4 or TS files directly to local storage and a secure cloud folder, preserving original metadata such as GPS coordinates and speed telemetry without re-encoding.
Pro Tip: Format your MicroSD card every 30 to 60 days via the camera's system menu to eliminate accumulated file fragmentation and bad memory sectors.
✅ Final Checklist
- MicroSD card is a verified "High Endurance" model formatted directly inside the camera interface.
- Mounting location sits fully within the windshield wiper sweep zone behind the rearview mirror.
- Power wiring is routed cleanly behind interior trim panels without obstructing side-curtain airbag zones.
- Lens tilt is calibrated to the 50/50 road-to-sky ratio to preserve optimal exposure on vehicle license plates.
- G-sensor sensitivity is set to "Low" or "Medium" to prevent false file locking over normal road irregularities.
Important Notes:
- Safety and Privacy Laws: Check regional statutes regarding two-party audio recording consent; some jurisdictions require passenger notification if interior cabin audio is actively recorded. Furthermore, ensure the physical camera position does not violate local vehicle codes regarding forward visual obstructions.
- When to Seek Professional Help: If you intend to utilize 24/7 parking surveillance mode via a hardwire fuse-tap kit, consult a certified automotive electrician to avoid draining your starter battery or tapping into critical safety-system fuses.
- Estimated Time and Cost: Basic DIY installation takes 30 to 45 minutes using standard vehicle 12V sockets. Beyond the initial dash cam cost ($70–$350), allocate $25–$45 for a premium high-endurance memory card, or an additional $15–$25 if purchasing a dedicated fuse-box hardwire kit.
How to Mount, Wire, and Power Your Dash Cam: Step-by-Step Installation
A clean plug-and-play installation keeps your dashboard uncluttered and eliminates loose cables that could distract you or interfere with driving controls.
Positioning the Camera for Maximum Field of View
Clean your windshield thoroughly with isopropyl alcohol before applying any adhesive. Standard suction cups often release in extreme summer heat or winter freezes, making static-cling film and high-bond 3M adhesive pads the preferred 2026 standard.
- Sit in the driver's seat and adjust your rearview mirror to your normal driving position.
- Place the dash cam directly behind the rearview mirror, slightly toward the passenger side. The camera body should be hidden from your direct driving line of sight to comply with local windshield obstruction laws.
- Check that the lens sits entirely inside the windshield wiper sweep zone.
- Angle the lens so that the frame captures roughly 40% sky and 60% road. Capturing too much sky washes out license plates because the camera auto-exposes for bright sunlight.
Routing the Cable and Verifying Power
Avoid letting the power cord dangle across your dashboard down to the center console. Use an inexpensive plastic trim tool to conceal the wire within minutes:
- Headliner: Push the USB-C power lead into the gap between the windshield glass and the headliner fabric, moving from the mirror toward the passenger side.
- A-Pillar: Route the wire across the top of the A-pillar trim. If your vehicle houses side-curtain airbags in the pillar, tuck the cable behind the weatherstripping along the door frame so it never crosses the airbag deployment path.
- Door Weatherstrip: Pull back the rubber door seal slightly and seat the cable inside the channel, running it down toward the floorboard.
- Footwell to Console: Run the wire under the passenger carpet trim or behind the glove box, securing it with adhesive wire clips until it reaches your 12V cigarette lighter socket or switched USB accessory port.
- First Boot Verification: Start your car. Listen for the dash cam's power-on chime and check the status LED. A solid green or flashing red light usually indicates active recording. Turn the ignition off; the unit should sound a shutdown chime and power down within 10 seconds.
How to Configure Essential Settings and Retrieve Video Footage
Modern 2026 dash cams offer automated operation, but default factory presets rarely maximize recording quality or system stability. Correct setup prevents storage bottlenecks and guarantees critical event preservation.
Optimizing Core Menu Configurations
- Set Loop Recording Intervals: Navigate to the video menu and set the clip cycle duration to 3 minutes. Industry testing confirms 3-minute segments offer the ideal balance between manageable file sizes and seamless cloud synchronization.
- Calibrate G-Sensor Sensitivity: Set the internal accelerometer to "Medium" or "Low." Overly sensitive sensors mistake potholes for collisions, filling the emergency storage buffer with false positives and halting standard loop overwriting.
- Synchronize Date, Time, and Resolution: Enable GPS auto-sync to calibrate forensic timestamps. Ensure resolution matches native sensor output (e.g., 4K at 30fps or 2K at 60fps) with High Dynamic Range (HDR) activated for low-light license plate clarity.
Exporting and Viewing Recorded Media
- Pair via High-Speed Wireless: Connect your smartphone to the dash cam's local 5GHz Wi-Fi network or plug a USB-C OTG cable directly from the camera to your phone.
- Locate Event Partitions: Open the companion application and navigate directly to the "Emergency" or "Event" folder rather than the continuous loop timeline.
- Export and Verify: Download the raw video file directly to internal phone storage. Verify that the file plays at full framerate with active audio and GPS telemetry overlays intact.
What If It Still Doesn't Work: Troubleshooting Power and Recording Glitches
Hardware conflicts, voltage drops, and memory degradation account for over 90% of field failures in automotive recording systems. When baseline setup steps fail, run this systematic hardware diagnostic:
- Replace the Flash Storage: Standard Class 10 cards degrade rapidly under 24/7 continuous writing cycles. Swap the card for an automotive-grade, high-endurance card rated for Video Speed Class 30 (V30) or higher.
- Measure Source Voltage with a Multimeter: Modern hardwire kits feature automated low-voltage cutoffs set between 11.8V and 12.4V. Measure the continuous and accessory circuits; if vehicle rest voltage sits below the threshold, the unit will not boot into parking mode.
- Perform a Manual Firmware Flash: Corrupted firmware halts boot cycles. Download the latest bin file from the manufacturer, load it onto a blank FAT32-formatted card, and power the device to force an automatic software reflash.
- Bypass Intermediate Accessories: Disconnect any 12V splitters, extension cords, or aftermarket OBD-II port adapters. Power the camera directly using the manufacturer-supplied power lead to rule out amperage drop.
- Consult Certified Technicians: If power distribution issues persist, contact a Mobile Electronics Certified Professional (MECP). Professional troubleshooting and installation correction nationwide generally ranges from $75 to $150.
Conclusion: Maximizing Road Safety and Evidence Integrity
Operating a dash cam correctly requires stable hardwired power, properly calibrated G-sensors, and reliable high-endurance media. According to verified research and automotive safety engineering data, properly configured recording systems reduce accident liability disputes by up to 80% while preserving undeniable digital evidence. For your next step, inspect your current microSD card to confirm it meets V30 high-endurance specifications, then perform a 60-second test export to ensure seamless operation when you need it most.
❓ Frequently Asked Questions
How do you format a microSD card directly on a dash cam?
Power on the camera, open the main setup menu, navigate to 'Format' or 'Format SD Card', and confirm your selection. Doing this directly inside the device ensures proper file system alignment and reduces writing errors during continuous loop recording.
What is loop recording, and what interval should you select?
Loop recording automatically overwrites the oldest unprotected video clips when the memory card fills up, preventing recording interruptions. Setting your loop duration to 3-minute clips is ideal because it keeps individual file sizes manageable for downloading while avoiding excessive video splitting.
How should you adjust the G-sensor sensitivity?
Configure your G-sensor to the low or medium sensitivity setting. If set to high, everyday driving over speed bumps, potholes, and railroad tracks will trigger false emergency locks, filling your card with write-protected files that block loop recording.
Can you use a dash cam without hardwiring it into your fuse box?
Yes, you can power a dash cam simply by plugging the provided power adapter into your vehicle's 12V cigarette lighter socket or a dedicated USB power port. Hardwiring is only required if you want continuous 24/7 parking surveillance when the vehicle is parked with the engine off.
How do you protect a video clip from being deleted after an incident?
Press the manual emergency lock button (often marked with a triangle, key, or lock icon) immediately during or after an incident. This flags the current video segment as protected, moving it into an event folder that loop recording cannot overwrite until manually unlocked.
Why does a dash cam repeatedly say 'Memory Error' or stop recording randomly?
This problem typically stems from using a standard consumer-grade card rather than an endurance-rated microSD card designed for high-heat continuous writes. It can also happen when the card is filled with locked event files, requiring an immediate in-camera format to restore functionality.



