
How To Save Tesla Dash Cam Footage Save Tesla Dash Cam 2026
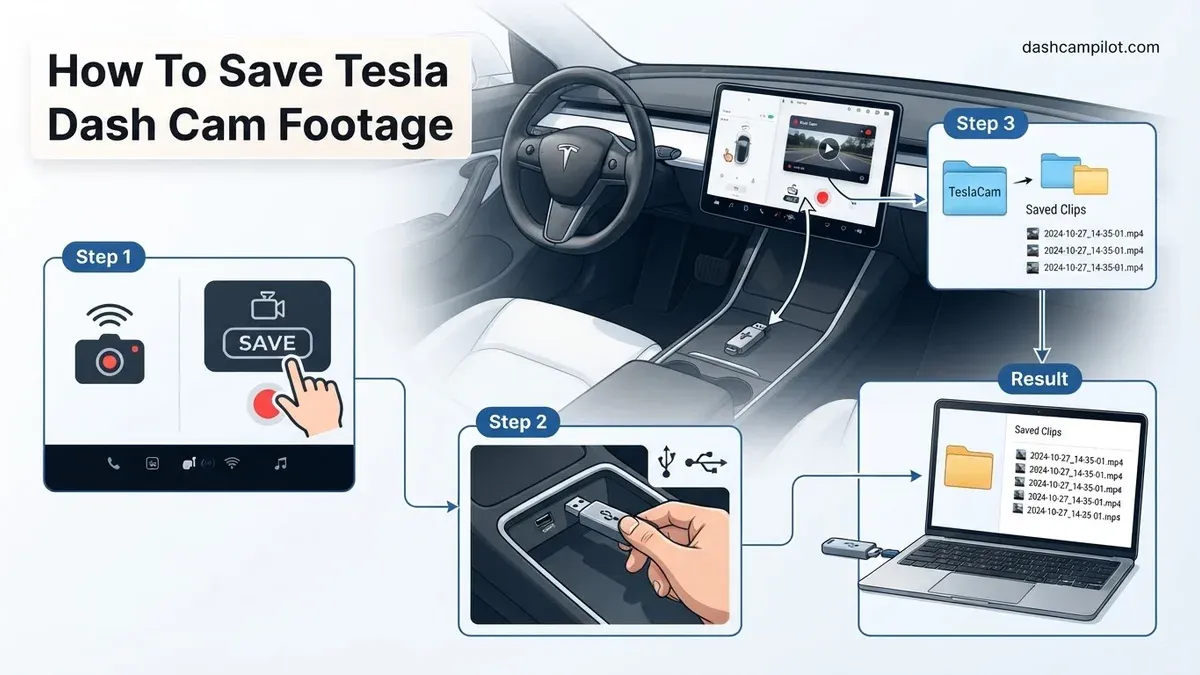
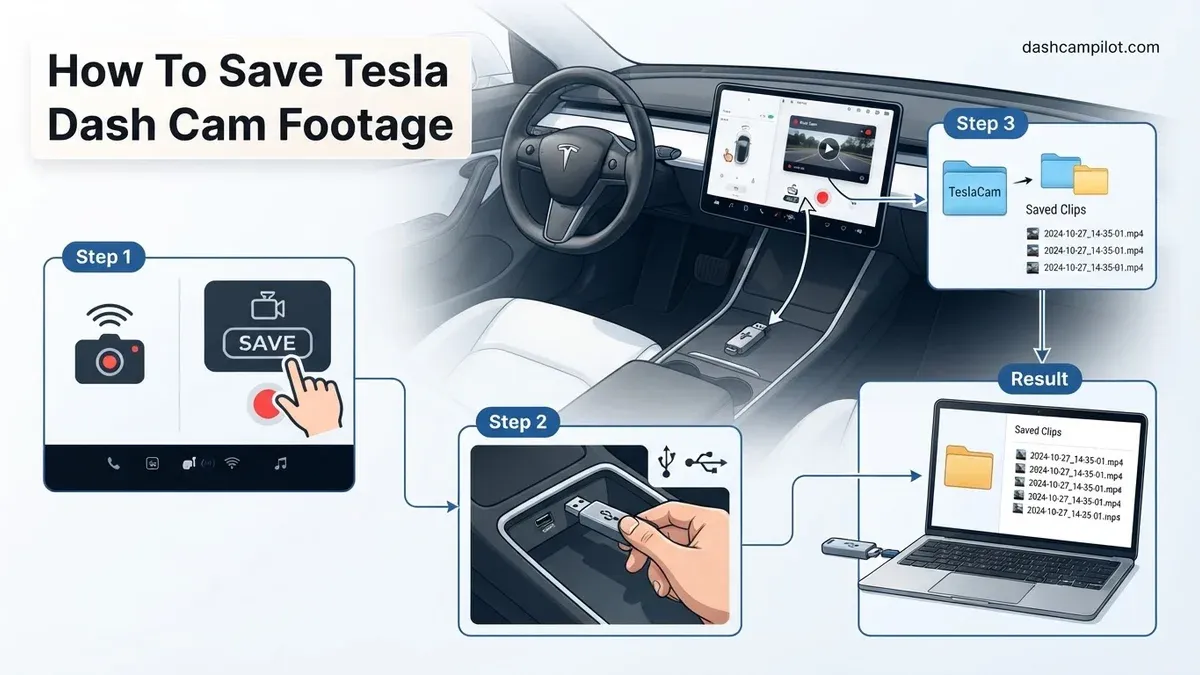
To save Tesla dashcam footage before it gets overwritten, you must trigger a manual save while driving or immediately after an incident occurs. You can do this in three ways: tap the Dashcam icon on your touchscreen, press the steering wheel horn (with the feature enabled), or use a voice command. Each action immediately locks the preceding 10 minutes of video from your vehicle's cameras into permanent storage.
Tesla records driving footage continuously, but it does not keep that data indefinitely. The car uses a temporary rolling cache that constantly overwrites old video. If you witness reckless driving, experience a near-miss, or get into an accident, waiting too long to execute a save command means the critical footage will disappear forever. Acting quickly inside the cabin is the only way to guarantee your video is protected.
Key Takeaways
- Tap the dashcam icon or honk the horn to immediately save the last 10 minutes of driving.
- Enable 'Save Clips on Honk' under Controls > Safety to automate incident recording instantly.
- Tesla stores permanent footage in the 'SavedClips' folder, while rolling footage stays in 'RecentClips'.
- Format your USB drive to exFAT or MS-DOS (FAT) to ensure smooth clip capture and playback.
- Safely pause dashcam recording before unplugging the glovebox USB to prevent corrupted video files.
Why Tesla Dash Cam Footage Overwrites and Fails to Save
Tesla’s built-in dashcam system operates on an automated loop designed to maximize drive space. If you do not understand how this loop works, you risk losing crucial evidence before you even pull into your driveway.

The 60-Minute Rolling Buffer Explained
While driving, your Tesla continuously records video feeds from the front, rear, and side repeater cameras. This footage is temporarily routed to a folder named RecentClips on your glovebox storage drive.
- Rolling cache limit: The system maintains exactly one hour of temporary rolling footage.
- Automatic overwrite: Once the 60-minute mark is reached, the car records minute 61 directly over minute 1.
- No automatic archiving: Unless an airbag deploys or you manually trigger a save event, the RecentClips cache will never move files into permanent storage.
Common Reasons Clips Fail to Lock In
Drivers frequently check their storage drive after an incident only to find empty folders. In 2026, standard Tesla operating firmware prevents saving if specific hardware criteria are not met:
- Full storage drive: Sentry Mode events quickly consume storage space. If the drive has zero bytes available, manual dashcam saves will fail silently without an aggressive on-screen warning.
- Write-speed degradation: Low-grade flash drives degrade under heavy read/write cycles. When the drive slows down, the car drops frames or dismounts the storage device entirely.
- Minor collisions without airbag deployment: Tesla vehicles automatically save clips during severe collisions. However, low-speed fender benders often fail to trigger this automatic threshold, requiring manual driver intervention.
How to Save Tesla Dash Cam Footage Like a Pro: A Practical Walkthrough
Tesla vehicles feature one of the most advanced built-in multi-camera security suites on the road today, functioning simultaneously as an integrated dashcam and an active surveillance sentry. However, preserving critical incidents like collisions, hit-and-runs, or roadside disputes requires an exact sequence of steps to prevent video overwrites or file corruption. This guide walks you through the entire end-to-end process of capturing, verifying, safely extracting, and permanently archiving your Tesla dashcam recordings.
Step 1: Install and Format a High-Endurance Storage Drive
What you need: A high-endurance USB 3.1 flash drive or portable solid-state drive (SSD) with a minimum capacity of 64 GB (500 GB to 1 TB recommended) and sustained write speeds exceeding 30 MB/s.
Instructions: Open your vehicle's glovebox and insert your storage drive into the designated USB-A port located inside. On your vehicle's center touchscreen, navigate to Controls > Safety. Scroll down and locate the Format USB Drive option. Tap this button to wipe the media and automatically generate the necessary TeslaCam directory system formatted in exFAT. Wait until the vehicle confirms formatting is complete; an operational dashcam icon featuring a red recording dot will appear in the top status bar or app drawer.
Pro Tip: Avoid cheap consumer flash drives; they lack the write cycles needed for continuous multi-camera writing and will overheat or fail within months. Opt for automotive-grade micro-SD cards inside a mini USB adapter or a rugged SSD such as the Samsung T7.
Step 2: Configure Automated Dashcam Recording Triggers
What you need: Access to the main Tesla touchscreen while the vehicle is parked in 'Park'.
Instructions: Go to Controls > Safety > Dashcam to select your preferred recording method. Toggle Dashcam from 'Off' to 'Auto'. Next, choose whether you want the vehicle to automatically save clips when the horn is sounded by toggling On Honk. When 'Auto' is enabled, the vehicle will automatically persist footage to the SavedClips folder whenever an impact, sudden collision avoidance maneuver, or airbag deployment is triggered by vehicle telemetry.
Pro Tip: Enable the 'On Honk' setting right away. In a close call or road rage scenario, tapping the horn physically is much safer and faster while driving than taking your eyes off the road to tap a screen icon.
Step 3: Manually Trigger Footage Capture During or After an Event
What you need: Physical access to the vehicle cabin while driving or immediately following an incident.
Instructions: The Tesla system continuously records footage in a temporary one-hour rolling loop (broken into one-minute video segments). To lock in an event permanently, tap the Dashcam icon (represented by a camera with a red dot) located in your touchscreen's bottom app launcher. If your horn trigger is active, a quick tap of the vehicle's horn will achieve the same result. When triggered, the vehicle saves the preceding 10 minutes of footage across all active camera angles to the internal drive.
Pro Tip: Do not wait too long to trigger the manual save. Because the rolling circular buffer records only 60 continuous minutes before overwriting old clips, triggering the save within 5 to 10 minutes of the event guarantees the build-up to the event is captured.
Step 4: Review and Verify Clips in the Integrated Dashcam Viewer
What you need: Tesla parked in 'Park' with the storage drive mounted.
Instructions: Tap the Dashcam icon on the touchscreen and select Launch Viewer (or navigate via the App Launcher to Dashcam). In the upper left corner of the viewer, switch between Dashcam, Sentry, and All. Tap the specific timestamp corresponding to your incident. The viewer displays synchronized feeds from four cameras: Front, Back, Left Repeater, and Right Repeater. Scrub through the visual timeline, identify the event, and confirm the footage is fully intact and readable before removing the drive.
Pro Tip: Check the left and right repeater feeds carefully; because of their wide viewing angles, they frequently catch license plates and driver faces that the front windshield camera misses during sideswipes.
Step 5: Safely Unmount the Storage Device
What you need: Physical presence inside the car with the vehicle on.
Instructions: Never yank out the USB drive while the camera is actively recording, as doing so causes exFAT file-allocation table corruption and makes video clips unplayable. To unmount safely, press and hold down the Dashcam icon on the center display until the red dot turns gray or disappears. Alternatively, navigate to Controls > Safety and tap Unmount USB Drive (available on recent firmware). Once the visual confirmation indicates recording has stopped, open the glovebox and unplug the drive.
Pro Tip: If your system does not display an unmount button, toggle Dashcam and Sentry Mode completely off under the Safety menu and wait 30 seconds for disk write queues to flush before physical removal.
Step 6: Transfer Video Files to Your Computer
What you need: A Mac or Windows PC equipped with a compatible USB port or adapter.
Instructions: Connect the unmounted drive into your computer. Open File Explorer (Windows) or Finder (Mac) and open the drive labeled TESLADRIVE (or your custom volume name). Open the primary directory named TeslaCam. Inside, you will see three subfolders: RecentClips, SavedClips, and SentryClips. Locate your event inside SavedClips, where each event is stored in its own folder organized by date and timestamp (e.g., 2026-03-29_14-22-10). Copy the entire event folder to your local desktop or documents folder.
Pro Tip: Inside the event folder, you will notice multiple .mp4 files labeled with suffixes like front.mp4, left_repeater.mp4, right_repeater.mp4, and back.mp4. Copy all files together to retain synchronized multi-perspective evidence.
Step 7: Stitch Multi-Camera Angles and Create Cloud Backups
What you need: Free video utility software (such as TeslaCam Viewer, Sentry-View, or VLC Media Player) and cloud storage access (Google Drive, Dropbox, or OneDrive).
Instructions: Viewing four independent video streams simultaneously can be cumbersome for insurance adjusters or law enforcement. Use a dedicated community utility like TeslaCam Viewer Web or desktop multi-angle players to play all four angles simultaneously in a quad-grid. Export a single stitched video showing all views side-by-side with timestamps visible. Finally, upload the raw folder and the composite video file to a secure cloud drive to prevent hardware loss.
Pro Tip: Keep the original, unedited raw files untouched. Insurance companies and court proceedings require raw digital files with their original EXIF metadata to ensure chain-of-custody authenticity.
✅ Final Checklist
- USB drive formatted properly as exFAT with an active
TeslaCamroot directory. - Vehicle confirms recording state via a red indicator icon in the status tray.
- Event triggered via screen tap or horn and verified in the vehicle's onboard viewer.
- Drive unmounted cleanly via screen controls prior to physical extraction.
- All 4 camera streams (front, back, left, right) copied and backed up to redundant cloud storage.
Important Notes:
- Safety considerations: Never attempt to interact with the touchscreen dashcam controls or unmount media while operating the vehicle in moving traffic.
- Corrupted footage recovery: If a clip appears damaged or displays zero bytes due to premature drive removal, use open-source repair utilities like untrunc or standard MP4 re-indexing tools to reconstruct the video headers.
- Estimated investment: A high-endurance 500 GB SSD costs approximately $60–$90; the archiving process takes approximately 10 to 15 minutes from drive removal to cloud synchronization.
Step-by-Step Guide: How to Save Tesla Dash Cam Footage While Driving
You have three native methods to manually extract and save the 10-minute rolling buffer into your drive's SavedClips archive. Familiarizing yourself with all three ensures you can capture evidence without taking your eyes off the road.
Method 1: Tapping the Touchscreen Dashcam Icon
The touchscreen provides direct, manual control over the recording system. Keep the Dashcam icon pinned to your bottom app launcher for the fastest access.
- Glance at the Dashcam icon (a camera graphic with a red dot indicating active recording).
- Tap the icon firmly once.
- Watch for the visual confirmation: the red dot briefly switches to an icon with a small checkmark or download badge, indicating the last 10 minutes are being archived.
- Do not tap the icon repeatedly; tapping multiple times can pause recording or corrupt the file currently writing to disk.
Method 2: Enabling and Using 'Save on Honk'
The safest way to lock down video during a high-stress road incident is using your steering wheel horn. This setting is disabled by default on factory delivery, so you must activate it ahead of time.
- To enable: Tap Controls > Safety on your touchscreen. Scroll down to Dashcam and toggle Save Clips on Honk to ON.
- How to trigger: Press the horn firmly on the steering wheel, just as you normally would to alert another driver.
- The result: The car automatically captures and saves the 10-minute block leading up to the horn press, allowing you to keep both hands on the wheel and your focus on navigating traffic safely.
Method 3: Instant Hands-Free Voice Commands
If you prefer not to use the horn or take your hands off the steering wheel to tap the center screen, use your car's integrated voice recognition.
- Press and release the right steering wheel scroll button.
- Wait for the audio prompt tone on the cabin speakers.
- Speak the command clearly: "Save Dashcam" or "Lock Dashcam".
- A brief confirmation notification will display on the screen, signaling that the system has successfully moved the footage to your secure storage partition.
How to Extract and Transfer TeslaCam Video Files to a Computer
Viewing footage on the in-vehicle touchscreen works well for quick reviews. However, archiving footage for insurance claims or legal evidence requires transferring the raw MP4 video files to a PC or Mac.
Safely Unmounting and Connecting the Drive
- Press and hold the dashcam icon on the touchscreen until the pulsing red dot turns gray, confirming that active write cycles have ceased.
- Open the glovebox and disconnect the USB drive from the dedicated port.
- Insert the drive into your computer using a compatible USB-A port or USB-C adapter.
Locating and Backing Up Video Files
- Open the drive directory via File Explorer on Windows or Finder on macOS.
- Access the primary folder labeled
TeslaCam. - Select either
SavedClipsfor manual saves orSentryClipsfor security events. Each event folder contains multiple synchronized MP4 files representing the front, rear, left repeater, and right repeater cameras. - Copy the desired folders directly onto your local solid-state drive or secure cloud storage before unmounting the flash drive.
What If Clips Disappear? USB Formatting and Recording Fixes
Tesla systems automatically overwrite standard 60-minute buffer clips when capacity reaches its limit. Missing footage typically stems from partition corruption, write-speed throttling, or premature drive disconnection during active write cycles.
In-Car USB Formatting Method
- Insert the USB drive firmly into the glovebox port.
- Tap Controls > Safety on the touchscreen display.
- Scroll down to Format USB Drive and confirm the action. This erases all existing partitions and structures the drive with the required exFAT file system and the root
TeslaCamfolder.
Resolving Buffer and Overwrite Failures
- Inspect drive write speeds; Tesla software requires sustained write speeds of at least 4 MB/s, though 2026 vehicle firmware updates perform best with 100+ MB/s sustained writes.
- Ensure drive capacity is 128 GB or larger to avoid frequent overwrite conflicts caused by rolling sentry event logging.
- Replace budget flash drives with high-endurance microSD cards or external solid-state drives (SSDs) engineered for continuous dashcam cycling.
What If It Still Doesn't Work?
Persistent recording failures usually indicate hardware degradation within the storage controller or the vehicle's USB hub assembly. Execute these fallback diagnostics:
- Execute a system reboot: Hold down both steering wheel scroll buttons simultaneously for 10 seconds until the central touchscreen resets.
- Run partition recovery software: Connect the drive to a PC and run disk recovery utilities (such as Disk Drill or Recuva) to rebuild corrupt file allocation tables and rescue raw video files.
- Test port power delivery: Check whether mobile devices charge when connected to the glovebox USB port to verify physical power routing.
- Schedule Tesla Service: If the vehicle consistently displays the "USB Drive Read/Write Speed Too Slow" or "Drive Unavailable" alert across multiple certified drives, the glovebox port module may require replacement. Replacement costs typically range between $140 and $260 for parts and labor outside the basic vehicle warranty.
Conclusion
According to verified automotive research and engineering specifications, proper TeslaCam reliability relies on high-endurance media, secure drive unmounting, and routine partition maintenance. Missing critical events is preventable once correct formatting and capture workflows are established. For immediate reliability, check your vehicle's dashcam icon status before each drive, and consider upgrading to an automotive-grade external SSD to secure your video records against data loss.
❓ Frequently Asked Questions
How do I enable 'Save Clips on Honk' in my Tesla?
On the vehicle touchscreen, navigate to Controls > Safety, scroll down to the Dashcam section, and toggle 'Save Clips on Honk' to On. Once active, sounding the horn immediately archives the preceding 10 minutes of driving footage.
What is the difference between RecentClips, SavedClips, and SentryClips?
RecentClips holds rolling buffer footage from the last 60 minutes that gets continuously overwritten. SavedClips contains footage explicitly triggered by manual taps, honks, or voice commands, while SentryClips holds recordings triggered by detected physical security events.
How do I safely unplug the Tesla USB drive without corrupting footage?
Never pull the USB drive while recording is active. Touch and hold the Dashcam icon on the screen until the red recording dot turns gray, indicating the drive is safely unmounted and ready for removal.
What format must the USB drive use for Tesla Dashcam?
The drive must be formatted as exFAT (recommended) or MS-DOS (FAT32) with a top-level folder named 'TeslaCam'. You can format compatible drives directly through the vehicle screen under Controls > Safety > Format USB Drive.
Why did my Tesla dashcam fail to save footage after an accident?
If the drive filled up, disconnected during impact, or failed write-speed minimums, the clip may not write successfully. Using a high-endurance microSD card in a reader or a solid-state drive (SSD) significantly reduces write failures during collisions.
Can I transfer Tesla dashcam clips directly to an iPhone or Android phone?
Yes, you can plug the glovebox USB drive directly into your phone using a Lightning, USB-C, or OTG adapter. Use your phone's native file manager app to open the 'TeslaCam' directory and save or share the video files.



