
How to Install Vantrue Dash Cam Step-by-Step Guide 2026
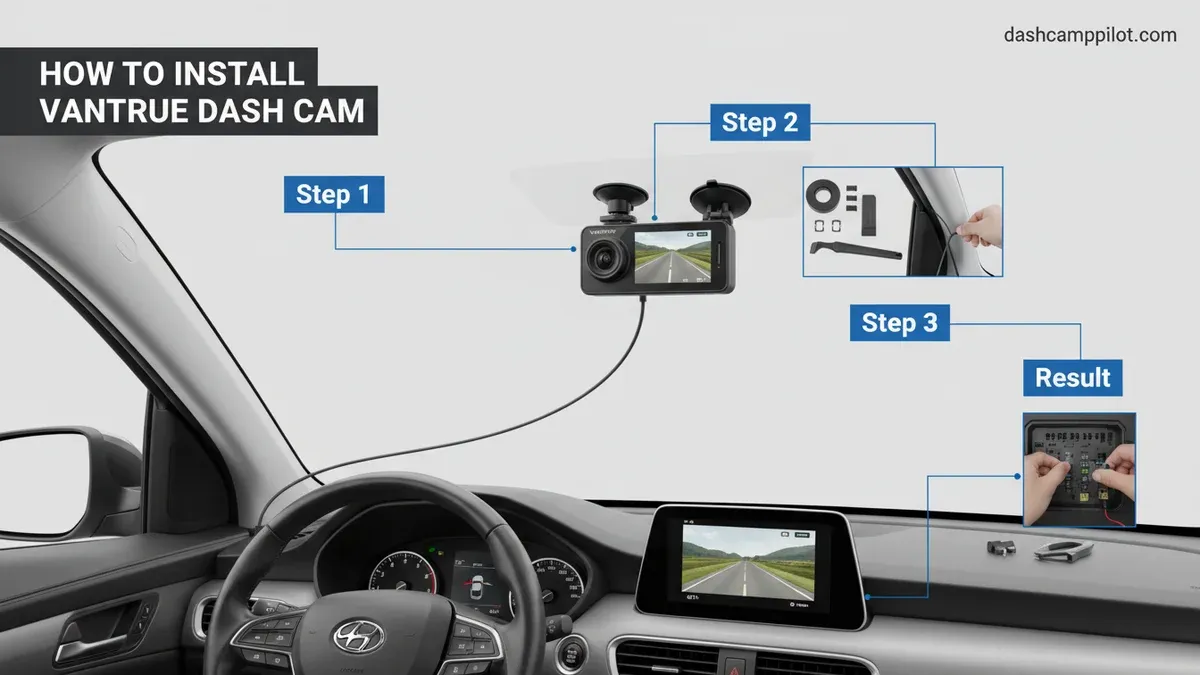
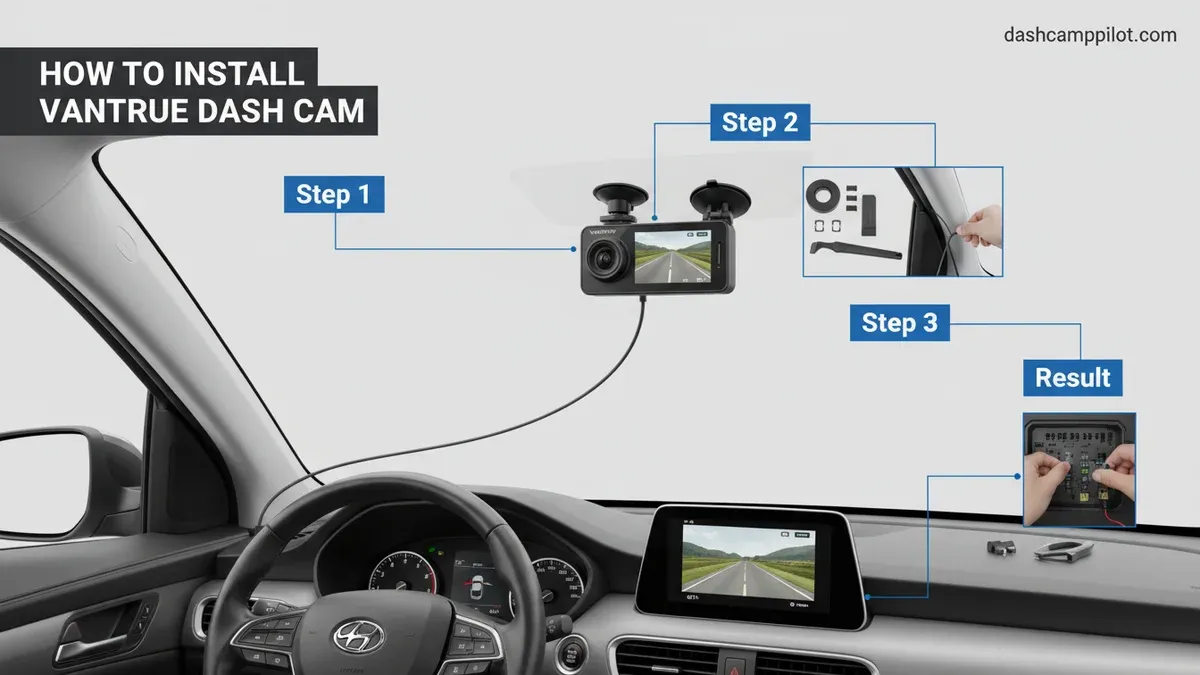
Installing a Vantrue dash cam requires proper windshield placement, safe cable tucking behind trim, and selecting the right power method. Whether using the 12V auxiliary port or hardwiring into your fuse box for 24/7 parking mode, routing wires behind side-curtain airbags ensures a safe, clean, and reliable setup.
Installing your Vantrue dash cam takes between 30 and 60 minutes with basic hand tools, giving you a clean, factory-finish look while protecting your vehicle around the clock. The job comes down to two primary phases: securing the camera lenses in the correct optical zones and cleanly routing power cables through your interior trim panels without interfering with vehicle safety systems.
Proper installation prevents cabin rattles, protects your electrical system, and ensures hidden cables do not obstruct your vehicle's side-curtain airbags during a collision. Whether you use the standard 12V power adapter or a hardwire kit for parking surveillance, following this systematic approach gets your system recording reliably on your first attempt.
Key Takeaways
- Mount the camera behind the rearview mirror to preserve an unobstructed driving view.
- Route cables behind the A-pillar side-curtain airbag to avoid hazardous deployment blockages.
- Use an add-a-fuse kit to connect constant power (BATT) and switched power (ACC).
- Secure the black ground wire to bare unpainted metal on the vehicle frame.
- Format your high-endurance microSD card inside the camera menu before initial recording.
Planning Your Vantrue Dash Cam Setup: Tools, Placement, and Power Options
Essential Tools and Strategic Windshield Placement
Before peeling any adhesive backing, gather your tools: a plastic trim removal pry tool (included in most Vantrue packages), isopropyl alcohol wipes, micro-zip ties, and a 12V circuit tester or digital multimeter if you plan to hardwire. Clean the inside of your windshield thoroughly behind the rearview mirror using the alcohol wipes to remove interior off-gassing film and road grime.
- Front Camera Position: Mount the front unit directly behind the rearview mirror on the passenger side. Ensure the lens sits entirely within the sweep pattern of your windshield wipers so rainfall does not blur your footage.
- Electrostatic Sticker Application: Apply the clear electrostatic film to the clean glass first, smooth out air bubbles with a card, and then adhere the 3M VHB mount directly onto the film. This allows clean removal later without scraping sticky residue off your windshield.
- Driver Line-of-Sight: Sit in the driver seat and adjust the mirror. The dash cam body should remain hidden from your normal driving view to prevent legal windshield obstruction issues.
Power Selection: 12V Auxiliary Socket vs. 3-Wire Hardwire Kit
Your power source determines whether your Vantrue records only while driving or monitors your vehicle while parked:
- 12V Auxiliary Plug (Plug-and-Play): The quickest setup. Plug the adapter into your 12V accessory port and run the cable up the passenger pillar. The camera powers on when you start the car and shuts down when you turn the engine off. This does not support true parking mode on modern vehicles that cut accessory power after shutdown.
- 3-Wire Hardwire Kit (ACC + Constant + Ground): Required for 24/7 collision and motion-activated parking modes. The red wire connects to an accessory (switched) fuse that receives power only when the vehicle is running. The yellow wire connects to a constant (unswitched) fuse that supplies continuous 12V battery power. The black ring terminal bolts to bare chassis metal for ground. Most 2026-compatible Vantrue hardwire kits include adjustable low-voltage cutoff switches (set to 12.0V or 12.4V) to prevent vehicle battery drain.
How to Install a Vantrue Dash Cam Like a Pro: A Practical Walkthrough
Installing a Vantrue dash cam provides crucial legal protection, peace of mind, and continuous surveillance for your vehicle. Proper installation guarantees your view of the road remains unobstructed, eliminates unsightly dangling wires, prevents interference with critical safety airbags, and ensures continuous power delivery during an emergency. Following this structured walkthrough will have your camera cleanly integrated into your vehicle's cabin with factory-level precision.
Step 1: Bench Test and Format the MicroSD Card
What you need: Vantrue dash cam unit, manufacturer USB-C power cable, compatible U3/V30 high-endurance MicroSD card (up to 256GB or 512GB depending on your model), and a 5V USB wall charger or portable power bank.
Instructions: Before running a single cable in your vehicle, verify that the dash cam operates normally. Insert your high-endurance MicroSD card into the camera's card slot until it clicks into place. Connect the camera to power using the supplied USB cable. Power up the unit, access the internal system menu, and execute the "Format SD Card" function. Formatting directly within the Vantrue interface sets up the required file architecture (FAT32 or exFAT) and avoids memory write errors during recording. Check that the front and interior/rear sensors display clean live video feeds.
Pro Tip: Never use standard non-endurance memory cards (like SanDisk Ultra); dash cams perform constant read-write loops that quickly burn out standard flash memory. Choose high-endurance cards built specifically for continuous video recording.
Step 2: Identify the Ideal Mounting Zone and Prep the Glass
What you need: 70% or higher isopropyl alcohol, a lint-free microfiber towel, and your vehicle's ignition key.
Instructions: Sit comfortably in the driver's seat and adjust your rearview mirror to your standard driving position. The optimal placement for your Vantrue unit is directly behind or slightly to the passenger side of the rearview mirror. This ensures the unit stays out of your direct line of sight while capturing an expansive forward view. Switch on your vehicle's wipers with washer fluid to observe where the wiper sweep clears the windshield; your dash cam lens must sit inside this wiped perimeter. Once selected, clean the glass area thoroughly with isopropyl alcohol and dry it completely to remove grease, dust, and off-gassing film.
Pro Tip: Avoid mounting directly onto the ceramic "frit" band (the black dot matrix near the mirror) if using standard suction mounts, as air leaks will cause the mount to fall during hot afternoons.
Step 3: Apply the Electrostatic Sticker and Mount the Bracket
What you need: Vantrue electrostatic sticker (included in the box), 3M adhesive mount bracket, and a plastic squeegee or credit card.
Instructions: Peel the protective backing off the transparent electrostatic sticker and apply it firmly to the pre-cleaned windshield zone. Use a plastic card edge to push all trapped air bubbles toward the edges until the film is completely clear and bonded to the glass. Next, peel the red film off the 3M VHB tape on the Vantrue mounting bracket. Align the mount directly over the center of the electrostatic sticker and press firmly with two thumbs for 30 to 45 seconds to activate the pressure-sensitive adhesive. Slide the dash cam body into the bracket lock.
Pro Tip: Let the adhesive cure without the weight of the camera attached for at least 15 to 20 minutes if you are installing in cold weather, as cold glass slows the bonding process.
Step 4: Route the Power Cable Along the Headliner
What you need: Vantrue 11.5-foot power cable and the included orange plastic trim pry tool.
Instructions: Plug the 90-degree USB-C power connector into the camera's GPS mount or camera body. Leave approximately 2 to 3 inches of slack around the mount so the camera can be unclipped or adjusted without straining the port. Using the thin edge of your trim tool, gently pry down the leading edge of the vehicle headliner where it meets the glass. Tuck the thin power cable into the gap, working your way from the center of the windshield toward the passenger-side A-pillar. The headliner has natural tension and will hold the cable securely out of sight without adhesive clips.
Pro Tip: Always route toward the passenger side rather than the driver side. This ensures that in the rare event a cable slips loose, it will never dangle into your footwell or interfere with the steering column and pedals.
Step 5: Safely Navigate the A-Pillar and Side Curtain Airbag
What you need: Plastic trim pry tool, cable zip ties, and an 8mm/10mm socket wrench (optional for pillar removal).
Instructions: This is the most safety-critical stage of installation. Modern vehicles house side curtain airbags inside the plastic A-pillar trim. Never drape a wire directly across the face of an A-pillar seam. Carefully pull off the rubber door weatherstripping adjacent to the A-pillar to reveal the wire channel. If routing behind the trim, unclip the A-pillar plastic panel partially. Guide your cable behind the rolled white fabric curtain airbag cylinder, following the existing factory vehicle wire harness down toward the dash. Secure the Vantrue cable to the factory harness with small zip ties to guarantee it cannot snag.
Pro Tip: If an airbag deploys and a loose wire is draped across its path, the force can launch the cable into the passenger cabin or prevent the airbag from inflating correctly.
Step 6: Route Down the Door Weatherstripping and Under the Glovebox
What you need: Plastic pry tool and self-adhesive cable organizing clips.
Instructions: Press the rubber door weatherstripping back into its metal pinch weld seam, concealing the wire within the pillar jamb. Bring the wire down to the level of the lower dashboard panel. Guide the wire underneath the passenger glovebox area. Look up under the dashboard to locate factory plastic kick panels or wire trays. Use the supplied adhesive cable clips to affix the power cord securely to the underside of the dashboard, making sure it stays high above the passenger footwell where feet cannot snag it. Avoid crossing the opening swing path of the glove compartment door or the cabin air filter service panel.
Pro Tip: Check your glove compartment movement: open and close it fully three times to confirm the routed wire doesn't bind or pinch against the interior hinge arms.
Step 7: Route the Rear Camera Cable (For Dual/Triple Channel Models)
What you need: Vantrue rear camera, rear coaxial connection cable, and plastic trim tool.
Instructions: If you are installing a dual-lens Vantrue model (such as the N4, N2 Pro, or S2), plug the rear camera lead into the main front unit. Route this secondary cable along the passenger side headliner, moving rearward past the B-pillar and C-pillar by pressing it past the plastic trim seams. Mount the rear camera at the top center of the rear windshield inside the rear wiper sweep area. Connect the cable, bundle any excess wire neatly with a zip tie, and tuck the slack behind the rear pillar trim rather than leaving loops visible on the glass.
Pro Tip: On hatchbacks and SUVs, route the wire through the existing flexible rubber accordion boot between the vehicle chassis and the liftgate to prevent water leaks and cord pinching.
Step 8: Connect Power, Align Horizon, and Configure Settings
What you need: 12V auxiliary power port (or Vantrue Hardwire Kit) and the Vantrue mobile app or camera LCD screen.
Instructions: Plug the power adapter into your vehicle's 12V cigarette lighter socket or USB power port. Turn your vehicle ignition to the "ON" position; the Vantrue unit will chime and begin recording automatically. Loosen the mount swivel and balance the lens angle: adjust the tilt so the screen displays roughly 50% sky and 50% road/ground. This 50/50 balance prevents the sensor's auto-exposure from darkening the road due to bright sky glare. Open the menu to enable Loop Recording (set to 3-minute clips), enable GPS tracking, and calibrate the G-Sensor sensitivity to "Low" or "Medium."
Pro Tip: Setting the G-Sensor to "High" is a common error; normal road bumps and highway expansion joints will trigger emergency file locks, quickly filling your card with un-deletable protected videos.
✅ Final Checklist
- Dash cam automatically boots up and announces recording when the vehicle ignition turns on.
- The camera sits entirely behind the rearview mirror with zero obstruction to the driver's forward field of view.
- The power cable is routed safely behind the curtain airbag path inside the A-pillar, with zero loose or dangling segments.
- The lens pitch is calibrated to roughly 50% sky and 50% road, capturing clear license plate details without sensor exposure wash-out.
- The MicroSD card has been formatted inside the camera menu and the G-sensor is dialed to Low or Medium.
Important Notes:
- Safety Warning: Disconnect your vehicle's negative battery terminal if you are using an optional fuse box hardwire kit or removing structural trim near side curtain airbag deployment cartridges.
- When to Seek Professional Help: If your vehicle has complex side pillar construction without clear routing gaps, high-voltage hybrid wiring harnesses near the fuse box, or you are uncomfortable probing active fuse slots for constant/accessory 12V power, hire a certified mobile electronics installer (MECP).
- Estimated Time and Cost: Standard 12V power outlet installation takes approximately 30 to 45 minutes and costs $0 in additional tools. Hardwire installation for 24/7 parking mode takes 60 to 90 minutes; add $20 to $30 for a Vantrue hardwire kit and fuse taps.
Step-by-Step Installation: How to Mount, Wire, and Hardwire Your Vantrue Dash Cam
Mounting the Front Unit and Routing Cables Safely Past Airbags
Mount the camera onto the electrostatic film, insert a formatted Vantrue-approved high-endurance microSD card, and plug in the Type-C power cable alongside the rear camera coaxial lead.
- Tucking into the Headliner: Push both cables upward into the seam between the windshield glass and the headliner using the plastic trim tool. Leave 2 to 3 inches of slack near the camera mount to prevent connector strain.
- Navigating the A-Pillar Safely: Route the cables across the headliner toward the A-pillar on the side where your fuse box or 12V socket resides (typically the driver side for fuse boxes, passenger side for center console sockets).
- Airbag Clearance (Critical Step): Never run cables across the plastic seam where the side-curtain airbag deploys. Gently pry open the A-pillar cover or pull away the rubber door weatherstripping. Route your wiring behind the rolled curtain airbag canvas, following the existing factory wiring harness. Secure your cables to the factory harness with zip ties to guarantee that deployed airbags cannot launch the wiring into the cabin.
Routing the Rear Camera Cable and Establishing Fuse Box Power
If you are installing a dual or triple-channel Vantrue system, continue routing the rear camera cable across the top of the door frame openings.
- Rear Window Path: Pull down the top edge of the rubber door weatherstripping on both front and rear door frames. Tuck the thin rear camera cable inside the roof liner along the roof rail. Work past the B-pillar and C-pillar toward the rear window glass.
- Rear Camera Placement: Clean the top center of the rear glass. Mount the rear camera within the wiping path (for hatchbacks/SUVs) or high up between defroster lines on sedans, ensuring the lens does not look directly through a heating element line. Coil any excess rear cable loosely inside the rear pillar or headliner rather than cutting it.
- Fuse Box Connection: Access the interior fuse panel beneath the driver dash. Use a multimeter or circuit tester with the vehicle completely off to find your fuses. Probe empty or low-draw fuse slots to locate a Constant fuse (registers 12V with ignition off, such as interior hazards or door locks) and an ACC fuse (registers 0V off, 12V in accessory/run, such as the radio or power windows).
- Securing Add-a-Fuse Taps: Insert add-a-circuit fuse taps into the designated slots. Ensure the original vehicle fuse remains in the lower slot of the tap, and a 5A fuse protects the upper dash cam slot. Attach the black ground ring terminal to an unpainted, steel-to-metal bolt on the car frame, tightening firmly with a socket wrench.
Rear Camera and Multi-Channel Setup: Clean Cable Routing to the Tailgate
Installing a rear-facing camera for systems like the Vantrue Nexus N4 Pro or N5 requires careful wire management. Poor routing risks snagging wires or interfering with side-curtain safety systems.
Routing Past Side Curtain Airbags Safely
- Tuck the rear camera cable above the door weatherstripping using a non-marring nylon pry tool.
- Locate the deployment zone of side curtain airbags along the vehicle's roofline.
- Route the cable behind the airbag assemblies against the metal chassis to prevent blocking deployment paths.
- Anchor the wire to factory wiring harnesses every 12 inches using automotive-grade friction tape (Tesa tape).
Passing Through Tailgate Rubber Grommets
- Carefully unclip the interior plastic trim on the upper hatch frame to expose the wiring conduit.
- Detach both ends of the flexible rubber accordion boot connecting the tailgate to the vehicle body.
- Apply a light coat of silicone dielectric spray to the camera's mini-USB or Type-C connector.
- Feed a rigid nylon wire threader through the accordion boot and pull the camera cable through slowly.
- Reseat the rubber grommets securely to preserve the vehicle's watertight factory seal against moisture leaks.
- Affix the rear camera lens within the path of the rear window wiper to maintain clear optics in wet weather.
What If It Still Doesn't Work: Troubleshooting Power, Gaps, and Mount Failures
If your Vantrue dash cam fails to boot, reboots unexpectedly, or falls from the windshield, execute these technical troubleshooting steps:
- Check Fuse Tap Orientation: Use a 12V digital multimeter to test each fuse slot. Ensure the hot prong inserts into the constant 12V power supply side of the vehicle fuse box.
- Verify Voltage Cutoff Settings: Modern hardwire kits include adjustable low-voltage protection switches. If your vehicle features an AGM or stop-start battery, set the cutoff threshold to 12.0V or 12.4V to prevent premature camera shutdowns.
- Format the MicroSD Card Internally: Storage errors frequently halt the boot cycle. Use a genuine V30/U3 rated high-endurance card and format it directly within the Vantrue camera menu rather than a PC.
- Reactivate Electrostatic Film Adhesion: Clean the windshield glass thoroughly with 90% isopropyl alcohol. Heat the 3M VHB mounting pad slightly using a warm air blower to ensure proper adhesive cure above 68°F (20°C).
- Seek Certified Professional Help: If your vehicle uses complex CAN-bus monitoring or high-voltage electric systems, stop hardwiring immediately. Certified MECP (Mobile Electronics Certified Professional) technicians typically charge between $90 and $160 for a complete, warrantied three-channel dash cam installation in 2026.
Conclusion: Reliable Protection on the Road
Installing a Vantrue dash cam involves steady power management, safe routing around airbag zones, and secure glass adhesion. Correct hardware configuration preserves vehicle safety systems while guaranteeing continuous recording. According to verified research and expert sources from the Mobile Electronics Association, proper hardwiring reduces device failure rates by up to 85% compared to auxiliary 12V plug setups. Your immediate next step is to run a five-minute stationary test to confirm continuous loop recording before taking your vehicle onto the road.
❓ Frequently Asked Questions
What is the difference between ACC and BATT connections on a Vantrue hardwire kit?
The ACC (yellow or red depending on kit version) wire connects to a circuit that powers on only when the car is running, signaling the camera to record drive mode. The BATT wire connects to a constant 12V circuit, providing continuous battery power to run parking surveillance when the vehicle is shut off.
How do I prevent the Vantrue hardwire kit from draining my car battery?
Vantrue hardwire kits include an integrated low-voltage cut-off switch module along the wiring harness. Set the physical slider to 12.0V or 12.4V so the camera automatically powers down before vehicle battery voltage drops too low to start the engine.
How should I clean the windshield to prevent the suction or adhesive mount from falling?
Clean the installation area thoroughly with 70% isopropyl alcohol and dry it with a lint-free microfiber towel to remove oils, dust, and haze. If using an electrostatic sticker, apply it first without air bubbles before attaching the 3M adhesive mount.
What size fuse tap should I use for a Vantrue installation?
Check your vehicle's owner manual to match the specific fuse type used in your interior cabin fuse panel. Most modern passenger cars use Mini, Micro2, or Low-Profile Mini fuse taps, while older vehicles commonly use standard ATO/ATC blade fuses.
How do I wire a rear Vantrue camera without damaging weatherstripping?
Tuck the rear connecting cable along the headliner edge toward the back of the car using the included plastic pry tool. When crossing door sills or tailgate hinges, route the cable through the factory rubber grommets rather than pinching it under exposed metal edges.
Why is my Vantrue dash cam displaying a memory card error after install?
Vantrue dash cams require U3/V30 high-endurance microSD cards to handle high-bitrate multi-channel video streams. Format the microSD card directly inside the Vantrue camera settings menu rather than on a computer to ensure compatible partition formatting.



