
How To Install Rexing Dash Cam Step by Step Guide 2026
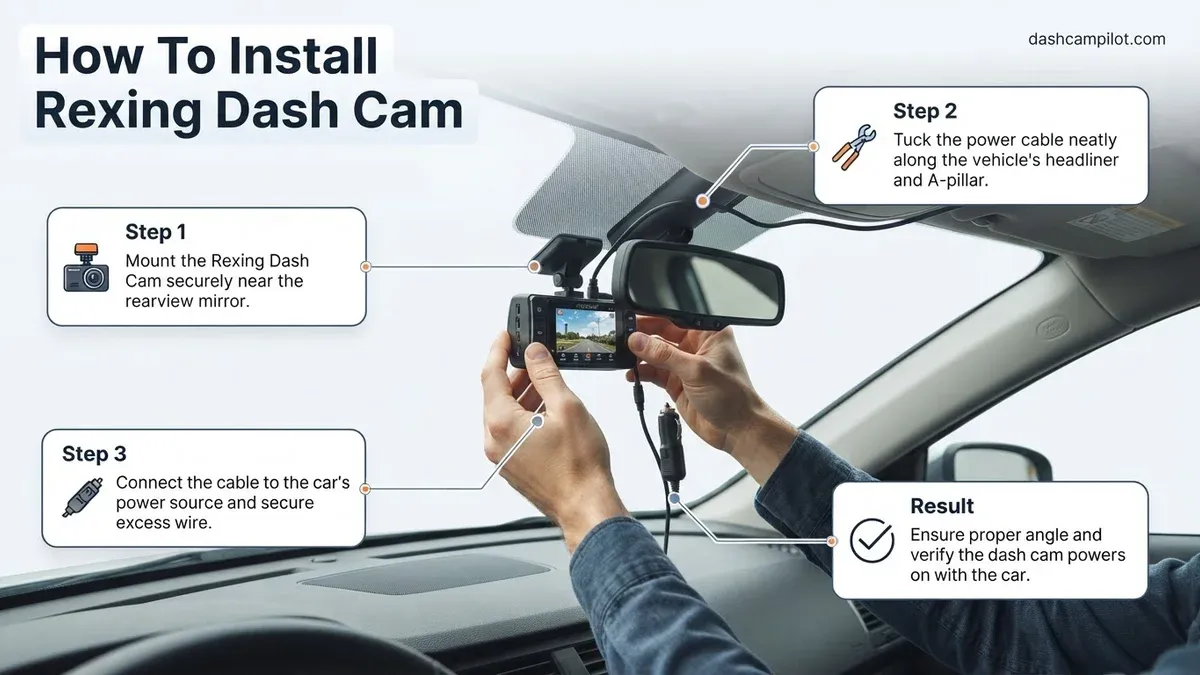
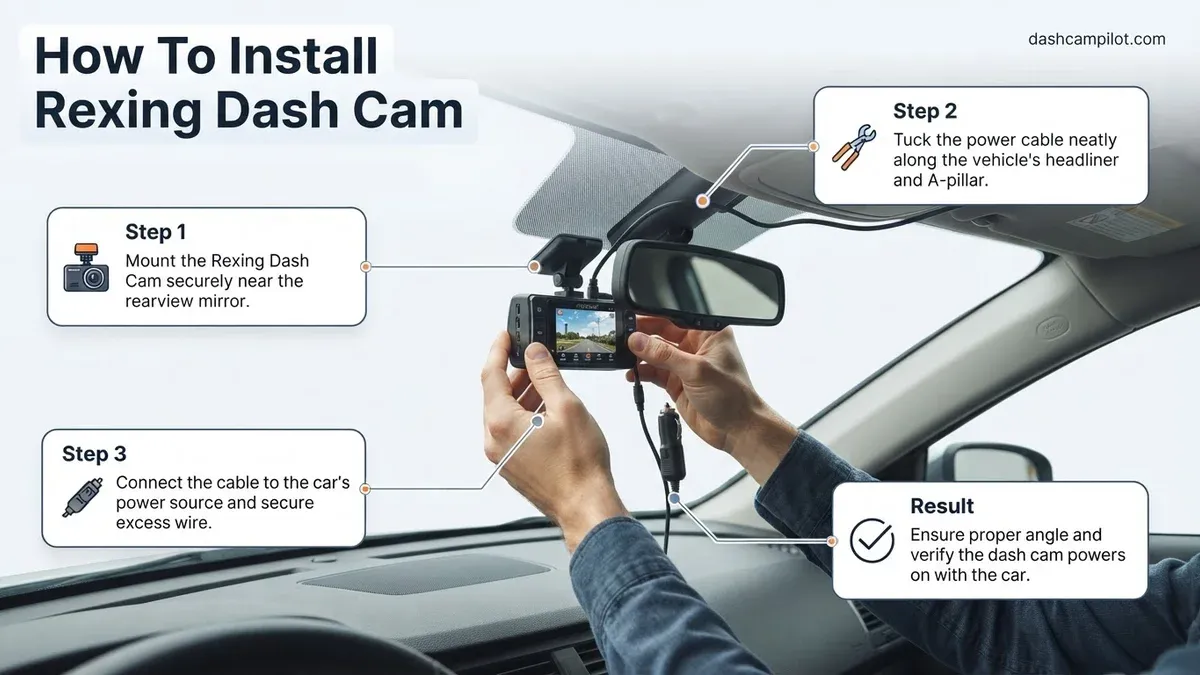
Learning how to install rexing dash cam hardware requires securing the camera base behind your rearview mirror, tucking the power cable along the cabin headliner, and connecting to a 12V outlet or vehicle fuse box. Taking a systematic approach takes less than thirty minutes and prevents loose wires from interfering with your driving vision or side curtain airbags.
You will explore optimal windshield mounting positions, cable-routing techniques for dual-channel setups, and the steps to safely hardwire for 24-hour parking monitoring. Here is what you need to know about how to install rexing dash cam hardware.
5 Essential Tools Needed for Mounting Your Rexing Unit
Gathering dedicated automotive trim and electrical tools prevents gouges on soft plastic panels and eliminates stripped wiring. Using proper tools ensures that factory seals, clips, and electronic modules remain completely undamaged.

Plastic Trim Removal Lever Tool
A non-marring nylon pry tool allows you to pull interior trims outward without marring your dashboard plastics. It wedges safely into the narrow gaps around the headliner and windshield glass.
Circuit Tester or Digital Multimeter
A 12V test light or automotive multimeter identifies which fuse slots carry constant battery power versus switched accessory voltage. This prevents incorrect wire taps that could drain the starter battery overnight.
Standard Automotive Fuse Puller Clamp
Factory fuse blocks pack small circuits close together, making hand extraction difficult. A specialized puller removes low-profile mini and micro fuses without bending delicate internal copper prongs.
Adhesive Cable Clips and Fasteners
Small self-adhesive routing clips guide excess cable under the dash and away from driver foot controls. Zip ties secure the primary harness against structural factory wiring bundles along interior pillars.
High Endurance MicroSD Memory Card
Continuous loop recording subjects storage cards to intense heat and constant write cycles. Choose a card carrying a Class 10 U3 rating that handles continuous 4K video streams without corrupted files Rexing officially specifies using a Class 10, UHS-I U3 MicroSD card (supporting capacities up to 256GB on models like the V1P Max) capable of sustained write speeds of at least 30 MB/s to prevent buffer overflow and write errors during continuous 4K loop recording (rexingusa.com, 'Recommended MicroSD Cards & Formatting Guide')..
With your equipment organized on the front seat, you can determine the best placement on the front glass. Once your gear sits ready, the precise windshield placement makes or breaks your recorded footage.
Where to Position Your Front Camera for Optimal Visibility
Mounting your camera correctly requires balancing maximum road coverage with strict adherence to vehicle safety and visibility laws. A poorly placed unit will block your road view or generate compromised footage during heavy storms.
Centering Behind the Rearview Mirror
Position the main lens directly behind the passenger side of the rearview mirror. This placement conceals the camera body from your natural line of sight while capturing an even perspective across both front fenders.
Clearing Factory Windshield Sensor Housings
Modern vehicles feature large forward-facing driver-assist camera boxes attached to the windshield glass. Ensure the Rexing wide-angle lens sits just beneath this plastic housing so it remains within the sweep path of your windshield wipers Under federal standards aligned with NHTSA safety guidance and 49 CFR § 393.60, vehicle safety devices such as dash cams must not obstruct the driver's primary field of view, specifying placement directly behind the rearview mirror or restricted to the upper 8.5 inches of the windshield wiper sweep zone (nhtsa.gov; 49 CFR § 393.60(e)(1)(ii))..
Adhering the 3M Mounting Plate
Clean the targeted glass area using isopropyl alcohol to strip away interior vinyl residue. Press the adhesive bracket firmly against the dry glass for thirty seconds, then wait 24 hours for full cure strength before sliding the camera weight onto the bracket.
Once the front bracket adheres securely to your windshield, choose how you want to supply power to the system. A secure mount is useless without power, forcing a choice between simple sockets and fuse taps.
12V Auxiliary Socket vs Fuse Hardwire Kit for Vehicle Surveillance
Choosing between the factory 12V power port and a hardwire kit depends on whether you require active surveillance while parked. Each method follows a distinct connection path inside the vehicle cabin.
Connecting to Auxiliary Power Sockets
The standard 12V lighter adapter offers an immediate plug-and-play connection without modifying factory electrical lines. It turns on when you cycle the ignition and shuts off automatically when you exit the car, making it ideal for lease vehicles.
Tapping Switched Ignition Fuse Slots
A hardwire kit connects directly into your cabin fuse box using add-a-circuit taps. You insert the accessory wire into a switched circuit, such as your radio or wiper fuse, which only energizes when the key sits in the accessory position.
If your kit features parking surveillance, connect the battery lead to a continuous power source like the hazard lights. Built-in voltage detection switches cut the power off if your battery drops to safe starting limits The Rexing Smart Hardwire Kit features a four-position low-voltage cutoff switch with threshold settings at 11.8V, 12.0V, 12.2V, and 12.4V for 12V systems (and 23.6V to 24.8V for 24V vehicles) to prevent battery drain during parking mode.
For installation, the kit utilizes add-a-circuit fuse taps typically paired with a 2A to 5A fuse for the dash cam, safely spliced into non-critical existing vehicle slots rated at 10A to 15A..
Grounding the Black Return Wire
The black ground lead must mount directly to an unpainted metal chassis bolt near the fuse box. Tighten the wire eyelet beneath the factory bolt head to prevent electrical resistance, screen flickering, and unexpected device reboots.
After establishing your power feeds, trace the harness up toward the windshield while preserving interior safety systems. Whichever power method wins, tucking that cable safely behind the A-pillar airbag prevents dangerous deployment snags.
How to Route Wires Behind Vehicle Airbags in 5 Steps
Running wires across safety deployment zones turns everyday dash cam cables into serious cabin hazards during an accident. Airbags deploy at speeds exceeding 200 mph, meaning aftermarket wiring must route behind safety inflators rather than over them According to vehicle safety testing published by SAE International (sae.org, SAE Technical Paper 2024-01-0988), aftermarket cabling routed in front of rather than behind A-pillar curtain airbags can compromise deployment, which occurs in under 30 milliseconds at speeds exceeding 160 mph.
Such physical obstruction can alter deployment trajectories or shear cables, increasing occupant Head Injury Criterion (HIC) measures by up to 28% in side-impact collisions..
Step 1 Tucking Under the Headliner
Begin at the dash camera base and press the power cable upward into the gap between the windshield glass and the headliner fabric. Use your nylon pry tool to work the wire progressively toward the driver or passenger side A-pillar.
Step 2 Releasing the a Pillar Cover
Pop the plastic pillar cover loose by pulling firmly near the top edge to disengage the retaining clips. Some vehicles contain a retention tether or small bolt hidden behind a plastic badge marked airbag that requires removal.
Step 3 Passing Behind Curtain Airbags
Locate the white fabric curtain airbag rolled tightly inside the pillar cavity. Run your Rexing wire along the metal structure behind this fabric roll, securing it to existing factory wire harnesses using zip ties.
Step 4 Guiding Down Door Weatherstripping
Pull the flexible rubber door gasket away from the steel frame opening to reveal an open running channel. Push the cable down this exposed groove until your wire reaches the lower kick panel area near the dashboard edge.
Step 5 Securing Excess Wiring Loom
Bundle any slack cabling cleanly and fasten it to internal subframe supports using nylon cable ties. Reinstall the plastic A-pillar trim and snap the rubber weatherstripping back over the door frame seam.
With front power safely secured, install the secondary wiring line if your Rexing model includes a rear recording channel. Once the trim snaps back into place, fire up the engine to configure your initial camera settings.
How to Install Rear Windshield Cables in 5 Steps
Connecting a secondary rear camera captures tailgating incidents and rear-end collisions while completing your vehicle security system. Running this secondary link through the cabin demands careful cable routing through the roofline trim.
Step 1 Mounting the Back Camera
Wipe the top center of your rear window with an alcohol prep pad. Position the camera lens directly between two defroster grid lines to prevent thin heating wires from obstructing your recorded image.
Step 2 Routing Along the Roofline
Plug the secondary camera cable into your front Rexing unit, then route the long wire across the passenger headliner. Work backward along the roof perimeter, tucking the thin wire into the plastic upper door moldings.
Step 3 Traversing the Rubber Boot
If you drive an SUV or hatchback, feed the video wire through the flexible rubber pass-through boot located between the car body and the liftgate. Spraying silicone lubricant inside this boot helps the mini USB head slide through without snagging factory wiring.
Step 4 Connecting the Mini USB
Pull the connector through the open tailgate frame and insert it firmly into the rear camera terminal port. Coil any leftover cable length inside the hollow tailgate cavity rather than leaving it bunched behind the glass.
Step 5 Aligning the Camera Angle
Turn on your car ignition to wake up the front display screen. Switch the Rexing display to the rear video feed and swivel the lens until the road horizon splits the image evenly.
Once all your hardware is securely mounted and wired, finish initializing the software and memory settings.
When to Format Your Memory Card in Rexing Settings
You must initialize your memory card directly inside the dash cam interface before recording road footage. Formatting prepares the storage blocks for the unique looping sequence used by Rexing firmware.
Navigating System Settings on Startup
Press the menu button on your device twice to open the core system setup screen. Scroll through the available options using the navigation arrows until you highlight the format option.
Executing in Camera Storage Formatting
Select the format command and confirm your selection to wipe the partition clean. The unit will establish a fresh exFAT or FAT32 file structure, clearing past read errors and optimizing writing stability.
Configuring G Sensor Collision Thresholds
Open the G-sensor sensitivity settings and adjust the threshold down to the low setting. High sensitivity settings cause regular road bumps and driveway expansion joints to lock normal video clips, filling up your card storage prematurely.
Review the following practical answers to common installation questions before your initial drive.
Answers to Common Rexing Installation Questions
Where Is the Best Place to Mount a Rexing Dash Cam
The best mounting position is directly behind your rearview mirror on the passenger side of the windshield glass. This placement maintains an unobstructed forward driving view, conceals the camera body from your eyeline, and stays within the path cleaned by your factory windshield wipers.
How Do You Hide Dash Cam Wires Along the Pillars
Unclip the interior A-pillar plastic cover and tuck your power wire securely behind the rolled side curtain airbag. Fasten the wire to existing factory electrical harnesses with nylon zip ties, then feed the remaining cable down through the open rubber door seal frame to avoid interference.
Why Does My Rexing Memory Card Keep Showing an Error
Memory card errors usually occur when you use a low-speed card or fail to initialize the storage within the device itself. Install a Class 10 U3 high-endurance card, then use the internal Rexing system menu to run an in-camera format sequence to fix the file structures.
Can a Rexing Hardwire Kit Drain My Car Battery
A properly installed smart hardwire kit will not drain your vehicle battery beyond safe starting limits. The integrated control module actively monitors electrical draw and automatically cuts power to the camera if your battery drops to eleven point eight or twelve volts.
How Do You Route Wires Through a Hatchback Tailgate
Run the rear camera cable across the interior headliner toward the upper tailgate hinge area. Pull the rubber conduit boot loose from both sides, guide the connection cable through this protective tube, and snap the weather seals back in place to prevent water leaks.
Finishing Your Rexing Dash Cam Installation
Completing this setup gives you complete peace of mind whenever you start your engine. You have eliminated blind spots, routed your wiring clear of active safety devices, and initialized the card for uninterrupted loop recording.
Taking the time to master how to install rexing dash cam hardware correctly protects your car interior and safeguards your collision evidence for years to come. Test the system during a short drive around your neighborhood to verify both viewing angles and auto-start features.



