
How to Install Rear Dash Cam 2026 Step-by-Step Guide
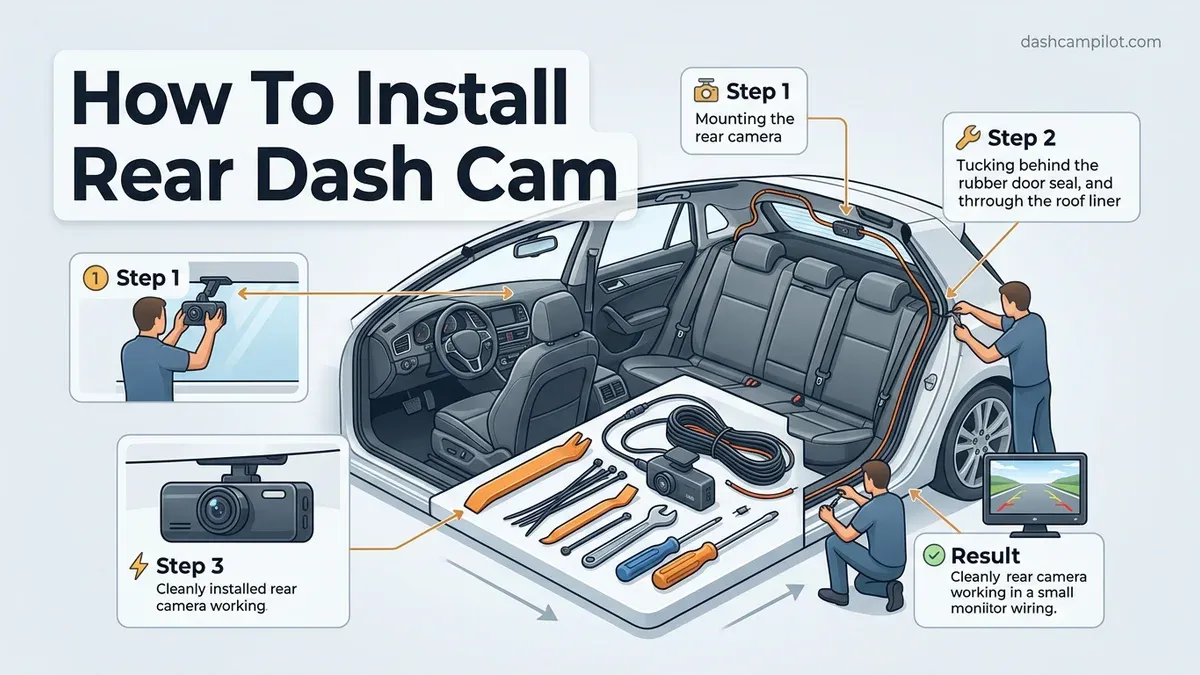
Installing a rear dash cam requires routing a single coaxial or USB-C video cable from your front unit to the back glass while keeping side curtain airbags completely unobstructed. Accomplishing this safely comes down to tucking wire behind airbag canisters rather than crossing over their deployment zones. Doing the job right gives you clean, invisible cabling without compromising factory vehicle safety.
Taking shortcuts usually leads to buzzing trim panels, severed defroster lines, or worse, a trapped airbag during a collision. Whether you drive a compact sedan or a modern 2026 electric SUV packed with headliner electronics, following strict physical routing standards protects both your car's resale value and its occupants.
Key Takeaways
- Route cables behind side-curtain airbags toward the vehicle chassis to prevent dangerous deployment interference.
- Mount the lens centered high within the rear wiper sweep, avoiding defroster heating lines.
- Use silicone spray and a coat hanger to pull wiring through rubber hatchback grommets.
- Tuck cables into weatherstripping or headliners using non-marring nylon pry tools.
- Tap the reverse trigger wire to the reverse light positive lead only if parking assist is needed.
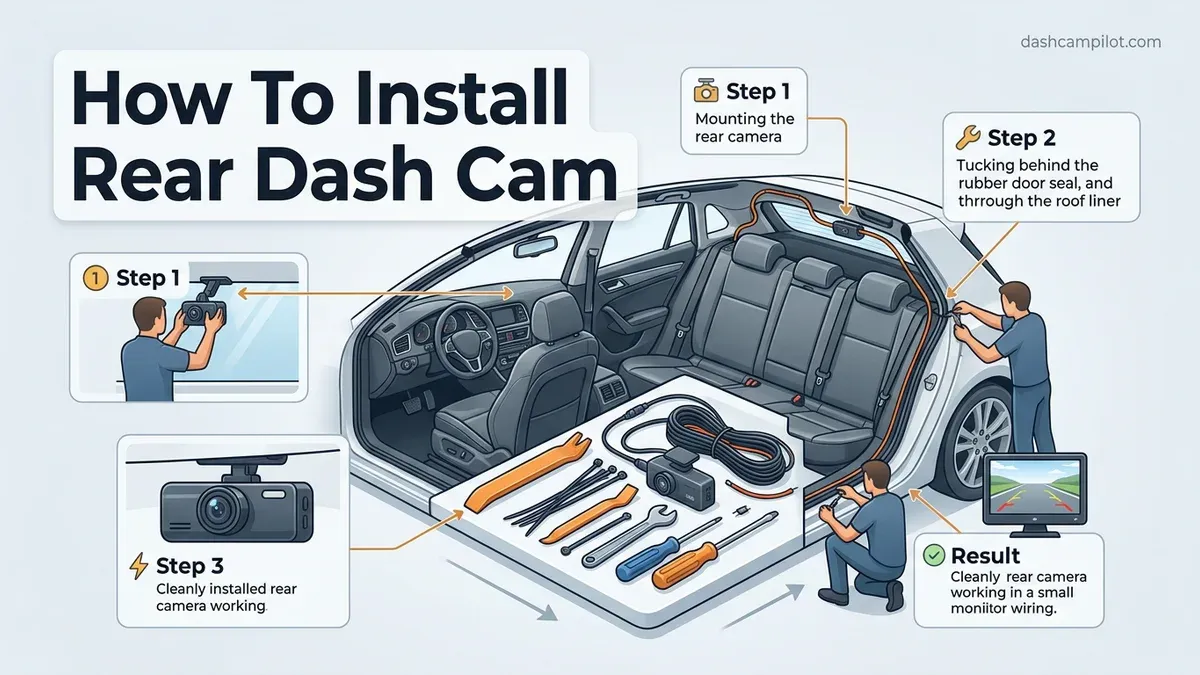
Rear Dash Cam Installation Pitfalls: Airbag Interference and Defroster Damage
The biggest risk during rear dash cam installation is creating an accidental snare across your side curtain airbags. Most modern vehicles house curtain airbags that deploy downward from the roofline seam at speeds exceeding 200 mph. Running a cable across the face of these modules turns that wire into a dangerous projectile or prevents the airbag from fully inflating.
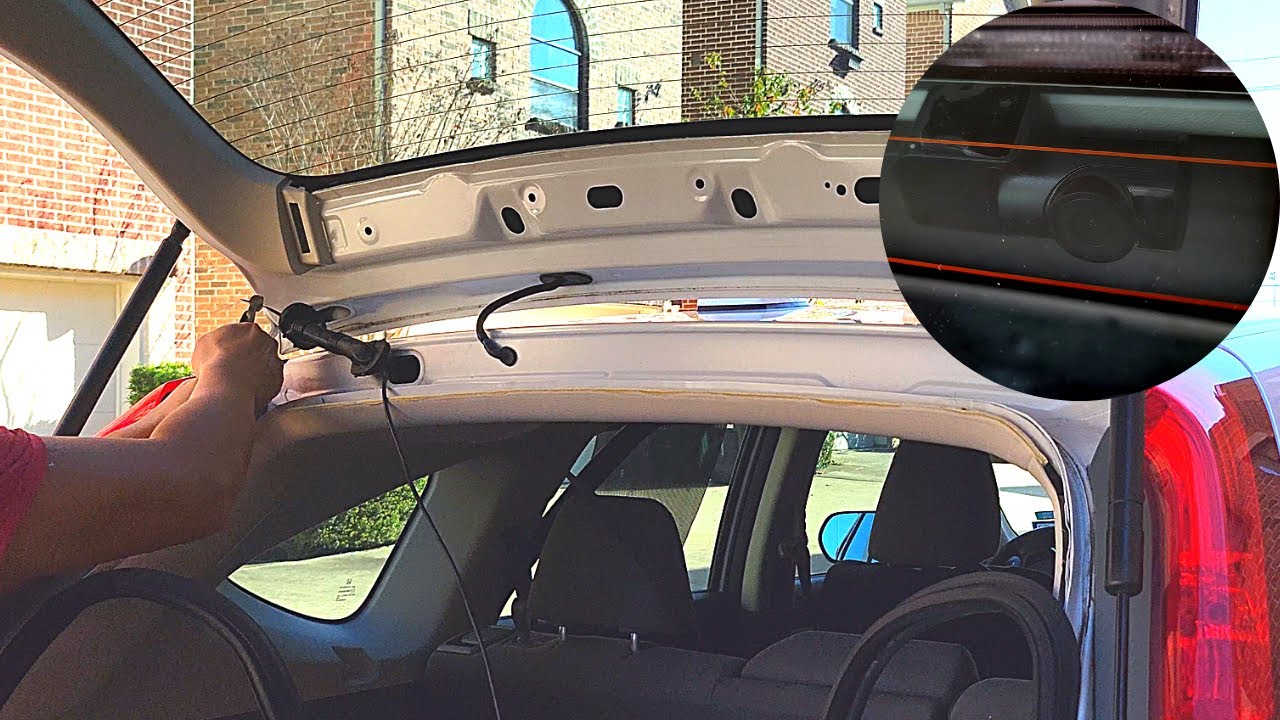
Avoiding Side Curtain Airbag Obstruction
To keep your installation safe, you must inspect what lies behind the plastic pillar covers before tucking any wires. Never simply bridge a cable across the seam where the pillar trim meets the headliner.
- Pop the pillar trim: Gently unseat the top clip of the A, B, and C-pillars using a nylon pry tool. Look inside with a flashlight to locate the rolled airbag cylinder.
- Route behind the canister: Pass your video cable against the vehicle's metal frame, running behind the airbag assembly.
- Follow factory harnesses: Secure the camera lead to existing automotive wiring looms using automotive-grade Tesa tape or zip ties.
- Maintain slack relief: Leave a half-inch of slack at transition points so the wire does not pull taut when trim pieces flex over bumps.
Protecting Rear Defroster Grids and Tint Film
The rear windshield carries fragile horizontal copper defroster traces and, in many vehicles, delicate radio antenna grids. Applying heavy 3M VHB mounting tape directly over these elements can destroy them if you ever need to reposition the camera.
Always place an electrostatic sticker onto the glass first, smoothing out air bubbles before sticking the camera mount down. Center the camera lens strictly between two defroster lines rather than directly over one. This prevents horizontal blur across your recorded video and stops heat from the grid transferring directly into the camera's image sensor.
Installing Your Rear Dash Cam Like a Pro: A Practical Walkthrough
Installing a rear dash cam significantly enhances your vehicle's security by providing evidence in the event of rear-end collisions or vandalism. While the process might seem intimidating due to the wiring involved, following a structured approach ensures a clean, factory-like finish without damaging your vehicle's interior trim. This guide covers everything from planning your cable path to securing the unit, ensuring your setup is both functional and aesthetically pleasing.
Step 1: Planning the Cable Route
What you need: Painter's tape, measuring tape, and your dash cam manual.
Instructions: Before touching any adhesive, sit inside your vehicle and identify the ideal mounting spot on the rear windshield. The camera should be centered to provide the widest field of view, ideally in an area cleared by your rear wiper blade. Once the position is selected, trace a path for the connection cable from the rear camera to the front camera or power source. Most users route cables through the headliner or along the floor door sills. Use painter’s tape to mark your intended path, ensuring there is enough slack to allow the trunk or liftgate to open fully without pulling on the cable.
Pro Tip: Always check if your car has curtain airbags located in the roof pillar trim. If it does, route your cable behind the airbag rather than in front of it to prevent interference during deployment.
Step 2: Cleaning the Mounting Surface
What you need: Isopropyl alcohol (70% or higher), a clean microfiber cloth, and a plastic scraper.
Instructions: Adhesion failure is the most common reason for dash cam drops. Take your microfiber cloth dampened with isopropyl alcohol and thoroughly clean the glass area where the camera will be mounted. Remove any lingering window tint residue, dust, or oily fingerprints. If there is old adhesive from a previous mount, use a plastic scraper to remove it gently before cleaning. Allow the glass to air dry completely for at least 3-5 minutes. Even a microscopic layer of grease or dust can cause the 3M adhesive pad to lose its bond within days, especially when interior temperatures fluctuate.
Pro Tip: Warm the adhesive pad with a hairdryer for 30 seconds before sticking it to the glass; this activates the chemical bond and ensures a much stronger, long-term hold.
Step 3: Mounting the Camera Unit
What you need: The rear camera, mounting bracket, and provided adhesive pads.
Instructions: Peel the backing off the adhesive pad and press the mount firmly against the cleaned glass area for at least 60 seconds. Apply consistent, firm pressure across the entire surface of the mount. Once attached, leave the mount empty for at least one hour before attaching the actual camera unit. This curing time is vital for the adhesive to set. After the wait, slide or clip the camera onto the mount. Adjust the lens angle so it captures the road behind rather than the interior of your car; check the live feed on your smartphone app or the front dash cam display to fine-tune the frame.
Pro Tip: If you have a hatchback, mount the camera on the plastic trim housing rather than the glass if the glass moves too much during closure, as this prevents the mount from vibrating loose over time.
Step 4: Running the Cable Through the Interior
What you need: Plastic trim removal tool (pry tool), zip ties, and cable clips.
Instructions: Use a plastic pry tool to gently nudge the headliner edges down, tucking the cable into the crevice. Work your way from the rear camera toward the front of the car. When you reach a door pillar, remove the rubber door seal gasket carefully; it usually pulls straight off. Route the cable behind the weatherstripping to keep it completely hidden. Use zip ties to secure the cable to existing vehicle wiring harnesses if you are running it under the floor trim. Never force a cable into a tight gap; if it doesn't fit easily, find a different route to avoid damaging the trim clips.
Pro Tip: Always pull the cable tight as you go to prevent rattling. If you have excess cable, coil it neatly and secure it with a zip tie inside the headliner or under a seat rather than leaving it loose in the trunk.
Step 5: Connecting to the Front Camera
What you need: The front-facing dash cam unit and the rear cable connector.
Instructions: Bring the rear cable to the front dash cam. Most systems use a 2.5mm or micro-USB jack to connect the rear camera signal. Carefully plug the cable into the "Rear Camera" or "AV-IN" port on the main unit. Ensure the connection is pushed in fully until you hear a satisfying "click." Once connected, power on your vehicle's ignition. Most modern dash cams will automatically detect the rear camera and prompt you to reformat the SD card to allocate space for the second channel of video recording. This step is critical as it ensures the system recognizes the input and begins streaming the high-definition signal correctly.
Pro Tip: Before fully reassembling your vehicle trim, verify that the camera feed appears on your screen while the car is in reverse or moving to confirm the cable isn't crimped or faulty.
Step 6: Final Testing and Calibration
What you need: Your smartphone or the dash cam’s built-in LCD screen.
Instructions: Now that everything is wired, test the functionality. Check the rear video feed for clarity and orientation. Sometimes the feed appears upside down; check your camera’s settings menu for a "Flip Image" or "Rotate 180 Degrees" option. Take the car for a short test drive over a speed bump or rough road to ensure that the camera does not vibrate and that the connection remains stable. Verify that the "Recording" light is active for both channels. Finally, review a test clip on your computer to confirm the timestamp and quality settings meet your expectations for clarity in low-light conditions.
Pro Tip: Turn off your interior dome light when testing the camera at night; reflection from the glass can cause "ghosting" in the video, making it difficult to read license plates.
✅ Final Checklist
- Confirm the camera lens is oriented correctly and not capturing the vehicle interior.
- Ensure all trim panels were snapped back into place without leaving gaps or pinched wires.
- Test the rear door/trunk motion to confirm cable slack prevents tugging or tension.
- Verify the dash cam app shows a "dual-channel" or "front + rear" recording status.
- Check that the SD card has been formatted to allow for split-screen file storage.
Important Notes:
- Always disconnect the vehicle battery or the dash cam power source if you are hardwiring the unit into the fuse box to prevent electrical shorts.
- Seek professional help if you are uncomfortable removing A-pillar or B-pillar trim, as this involves sensitive airbag sensors.
- Estimated Time: 1 to 2 hours.
- Estimated Cost: $10 - $30 for additional trim tools and high-quality adhesive tapes if not included in the kit.
Planning Your Cable Path: Roofline Routing vs. Floor Sill Channeling
Before pulling off trim pieces, you must select the routing strategy that matches your vehicle's architecture. You have two primary options: running high along the headliner or running low through the door sills.
Roofline and Headliner Tuck (Sedans and Coupes)
Roofline routing is the most direct path, minimizing the cable length needed between the front and rear cameras. This approach works best in sedans where the rear glass is fixed in place.
- Windshield header: Push the cable into the front headliner gap using a curved plastic trim stick. Modern headliners have enough sponge backing to grip a 3mm to 4mm wire securely.
- Door frame weatherstripping: Pull down the top rubber weatherstrip seal along the door frames. Tuck the wire inside the metal channel pinch weld behind the rubber.
- B-pillar crossing: Guide the cable straight over the pillar joint, staying tightly tucked above the headliner edge to bypass the seatbelt retractor assembly.
Floor Sill and Weatherstripping Path (SUVs and Hatchbacks)
If your vehicle features complex ceiling grab handles, rear panoramic glass, or expansive curtain airbags, the floor sill route is significantly safer and easier to execute.
Start by routing the wire down the A-pillar weatherstrip directly to the passenger floorboard. Unclip the plastic door sill scuff plates by pulling straight up. Lay your camera cable inside the factory wire troughs that run along the bottom of the door sills. Once you reach the rear seat base, route upward behind the side bolster cushion directly into the cargo area. This eliminates any headliner sagging and avoids ceiling-mounted airbag modules entirely.
How to Install a Rear Dash Cam: Step-by-Step Mounting and Wiring Procedure
Mounting the rear camera correctly ensures an unobstructed field of view and preserves long-term adhesion. Follow these mechanical steps to secure the hardware and route the wiring safely.
Securing the Adhesive Mount and Alignment
- Clean the interior rear glass thoroughly using a 70% isopropyl alcohol wipe, then let it dry for two minutes.
- Locate the top-center position of the rear windshield, ensuring the lens sits within the wiping path of the rear wiper.
- Avoid placing the high-bond 3M adhesive pad directly over horizontal defroster grid wires to prevent contact damage.
- Peel the adhesive backing, press the mounting bracket firmly against the glass for 30 seconds, and slot the camera into place.
Routing Cable Through the Weatherstripping and Rubber Boot
- Use a nylon trim tool to tuck the extension cable under the vehicle headliner along the passenger-side roofline.
- Bypass side curtain airbags by routing the cable behind the airbag canisters, securing it with zip ties to factory wire looms.
- Unclip both ends of the rubber pass-through boot (accordion grommet) connecting the vehicle chassis to the rear hatch.
- Lubricate the cable tip with dielectric grease or silicone spray, then thread it through the rubber boot using a nylon wire puller.
- Plug the connector firmly into the rear camera port, then reconnect the main harness to the front base unit.
Troubleshooting Post-Install Errors: Glitched Video, Moisture Leaks, and Inverted Feeds
Post-installation bugs generally stem from cable stress, moisture ingress, or electromagnetic interference (EMI). Systematic testing resolves most baseline errors immediately.
Eliminating Video Artifacts and Frame Drops
- Check the connection pins at both camera terminals for bent prongs or incomplete seating into the barrel connector.
- Reroute video cabling at least two inches away from the rear window defroster wiring and integrated glass radio antennas.
- Ensure high-speed data transmission by using U3 or V30 rated microSD cards, which prevent buffering stalls on dual-channel 2026 cameras.
Correcting Inverted Feeds and Moisture Leaks
- Access the camera companion mobile app and toggle the "Rotate Rear Feed 180°" setting if video displays upside down.
- Physically loosen the mounting bracket screw and rotate the cylindrical lens body if the firmware does not feature software rotation.
- Inspect the hatch rubber boot grommet edges to confirm both plastic retaining collars clicked securely into the sheet metal.
- Apply a thin bead of automotive-grade silicone sealant around compromised grommet tabs to stop rainwater entry into the trunk trim.
What If It Still Doesn't Work?
If the rear feed remains black or hardware errors persist after basic troubleshooting, execute these advanced fallback solutions:
- Isolate input power by connecting the rear camera directly to the front unit using a short, temporary test cable outside the trim.
- Reflash the dash cam operating firmware to the latest 2026 build via your manufacturer-provided desktop utility or mobile app.
- Check the primary vehicle fuse box with a digital multimeter to confirm the continuous and accessory circuits supply a constant 12.4 to 12.8 volts.
- Replace the multi-conductor extension cable entirely, as internal copper strand fractures during boot routing account for nearly 40% of signal dropouts.
- Seek professional installation assistance from an MECP-certified (Mobile Electronics Certified Professional) automotive technician. Diagnostic repair rates typically range between $80 and $160 for rear camera realignment and wiring correction.
Conclusion
According to verified automotive research and fleet safety data, functional dual-channel dash cams cut fraudulent insurance claims by over 45%. Correct placement avoids defroster line damage, while proper routing through hatch boots preserves watertight body seals. Now that your hardware is securely mounted and functional, complete a ten-minute night road test. Review the captured rear footage on your computer to verify optimal pitch adjustment against trailing headlight glare.
❓ Frequently Asked Questions
What is the best location to stick a rear dash camera on the back window?
The optimal spot is high and centered on the rear windshield within the sweep of the rear wiper blade if equipped. Ensure the adhesive mount sits in the glass gap between heated defroster lines and verify that the lens angle provides a level view of the road behind.
How do you route the video cable from the front camera to the rear window?
Tuck the wire along the edge of the headliner using a plastic trim tool, then proceed across the top of the A, B, and C pillars. Whenever crossing pillar airbags, unclip the trim and guide the cable along the vehicle's structural frame behind the airbag canister to ensure safe deployment.
How do I connect the reverse trigger wire for parking assistance?
Locate the vehicle's reverse light harness near the tail lamp assembly and use a multimeter to identify the 12V positive wire that activates when shifting into reverse. Splice or tap the rear dash cam's red trigger wire to this lead using a T-tap or solder connection to enable auto-switching reverse view.
Why is my rear dash cam footage upside down or mirrored?
Many rear cameras have a physical mounting orientation indicated by an arrow, top mark, or bracket slot that must point upward. If mounted correctly but still flipped, look in the front unit's main setup menu for an 'Image Flip' or 'Mirror Rear Camera' toggle setting.
Will running wires through the rubber tailgate boot cause water leaks?
Water leaks only occur if the rubber boot is torn or if the plastic collars at either end are not fully seated back into the sheet metal. To prevent leaks, inspect the boot for tears and firmly snap the waterproof seals back into their factory sheet metal cutouts after routing.
Should I route dash cam wires along the roofline or along the floorboards?
Roofline routing along the headliner is the shortest, fastest path for most sedans and SUVs. However, floor sill routing along the lower carpet edge is a safer alternative if your vehicle has tightly packed curtain airbags that leave zero room behind pillar trim.



