
How To Install Rear Dash Cam On Hatchback Install Rear 2026
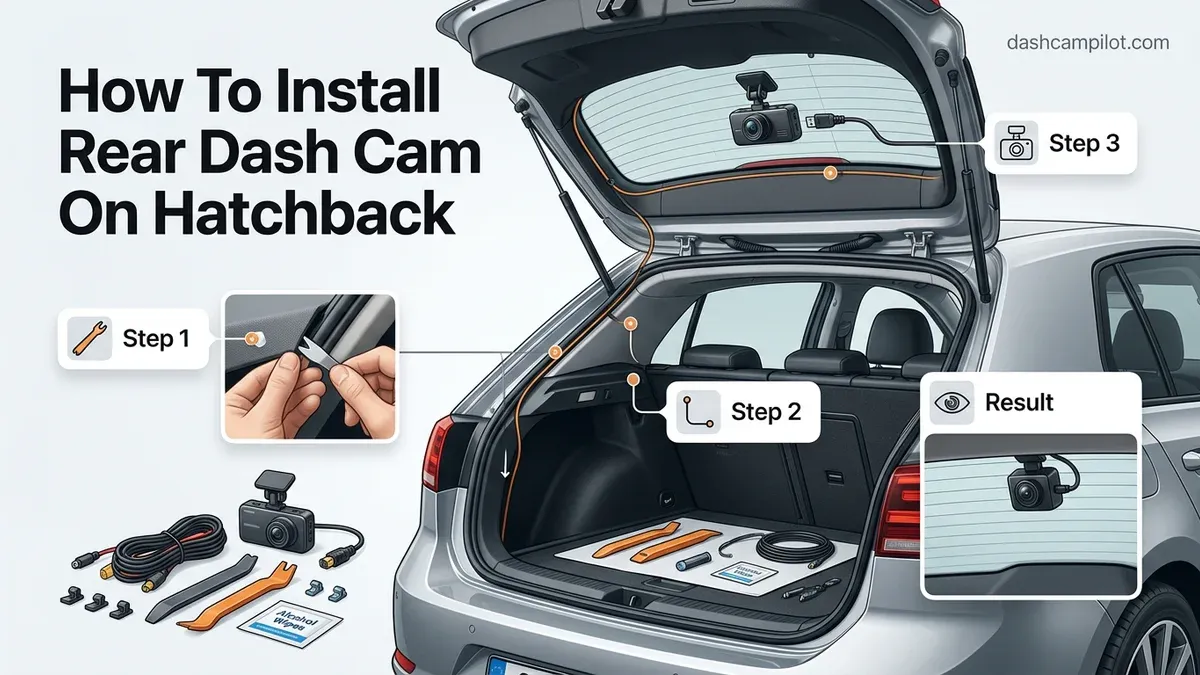
Installing a rear dash cam on a hatchback requires running the coaxial or USB-C signal cable through the factory rubber boot connecting the vehicle roof to the tailgate. If you simply drape the wire across the hatch opening and over the weatherstrip, the closing steel frame will crush the cable within days. Even worse, that crushed seal allows rainwater to track along the wire straight into your headliner and trunk spare-tire well.
Taking the extra time to fish the wire through the OEM grommet preserves the vehicle's watertight factory seal and ensures the cable flexes naturally every time you open the trunk. Modern 2026 hatchbacks feature tighter weather seals and complex pillar electronics, making structured cable routing vital to prevent electrical faults and water damage.
Key Takeaways
- Thread the video cable through the rubber tailgate boot to prevent water leaks and wire pinching.
- Route wiring behind side-curtain airbags along the vehicle pillar trim to guarantee safe deployment.
- Mount the camera lens inside the rear wiper sweep zone, avoiding horizontal defroster grid lines.
- Use silicone spray lubricant and a zip tie puller to glide cables through tight grommets easily.
- Leave adequate cable slack inside the hatch frame to prevent tension when opening the liftgate fully.
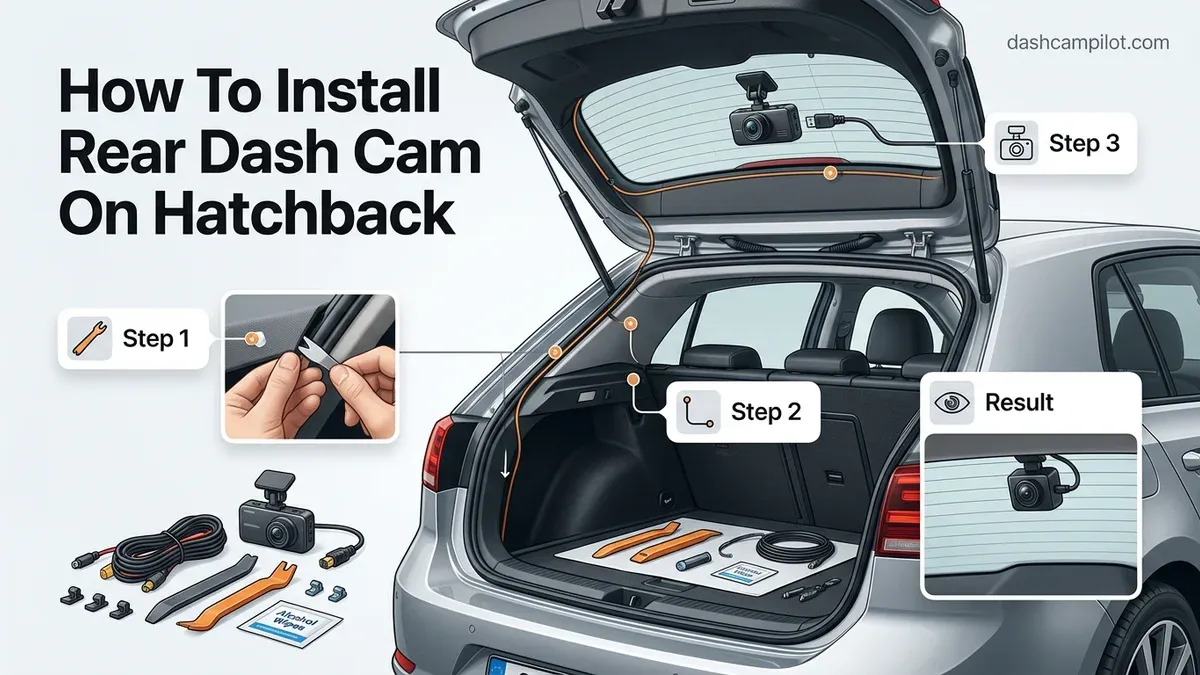
Hatchback Dash Cam Challenges: Why Tailgate Wiring Pinches and Leaks
Unlike sedans with static rear windshields, hatchbacks present an active mechanical challenge. Every time you open your trunk, the distance and angle between the car roof and the rear glass dramatically change. Understanding these physical forces helps you avoid the two most common installation disasters: sheared cables and hidden cabin water leaks.
The Weatherstrip Pinch Point and Water Ingress
The rubber weatherstrip outlining your trunk opening is engineered to compress tightly against the hatch frame to block water, dust, and road noise. Laying a 3mm or 4mm dash cam wire over this gasket breaks that compression seal. Rainwater hits the roof, flows into the drainage channel, meets the pinched wire, and uses it as a siphon.
- Capillary action leaks: Water creeps along the braided cable sleeve directly under the plastic trim, pooling behind the C-pillar.
- Shearing forces: Steel hatch hinges apply hundreds of pounds of closing force, instantly flattening or severing internal copper strands.
- Short-circuiting risks: Damaged camera wires can blow internal camera fuses or trigger body control module (BCM) warning lights on 2026 digital displays.
Boot Torsion and Cable Fatigue
Tailgate hinges rotate anywhere from 70 to 110 degrees during operation. When wires are threaded through the rubber accordion boot without sufficient slack, they pull taut at full extension. Over months of grocery loading and hatch cycles, repetitive mechanical stress causes internal wire fracture at the hinge pivot point, leading to intermittent rear video feeds.
How to Install a Rear Dash Cam on a Hatchback Like a Pro: A Practical Walkthrough
Installing a rear dash camera on a hatchback presents unique challenges compared to a standard sedan, primarily because the liftgate moves independently from the vehicle chassis. Routing video cabling through the moving tailgate while maintaining watertight integrity and avoiding airbag interference requires careful technique. Following this walkthrough guarantees a clean, factory-finish installation that protects your vehicle's electronics, preserves weatherproofing, and ensures crystal-clear rearward recording.
Step 1: Bench-Test the System and Map Your Route
What you need: Dash cam kit (front and rear units), included power adapter, 12V cigarette socket or portable power bank, and masking tape.
Instructions: Before pulling apart your vehicle's interior panels, unbox the dash cam system and connect the rear camera to the front unit using the provided video cable. Plug the system into a power source to verify that both video channels stream and record properly. Once verified, inspect your hatchback's interior to map your installation path. Note which side of the tailgate contains the factory rubber wiring boot (the corrugated rubber hose connecting the hatch to the vehicle body). Planning to route the cable along the same side as the rubber boot will prevent unnecessary cross-cabin wire runs later.
Pro Tip: Place small pieces of blue masking tape on the headliner and tailgate trim to mark your planned wire route before starting physical disassembly.
Step 2: Clean and Mount the Rear Camera
What you need: Isopropyl alcohol (70% or higher), microfiber cloth, and the rear camera unit with its adhesive mount.
Instructions: Sit inside the cargo area and locate the ideal mounting spot at the top center of the rear windshield. Ensure the camera lens sits entirely within the sweep of your rear wiper blade so your footage remains clear in rain or snow. Wipe the selected glass area thoroughly with isopropyl alcohol and let it flash dry for 60 seconds. Peel the protective backing from the camera’s high-bond 3M adhesive pad, position the camera horizontally, and press firmly against the glass for 30 to 45 seconds. Ensure the lens points directly between the defroster grid lines rather than directly over a heating element wire.
Pro Tip: Never mount the adhesive directly over a rear defroster filament; the heat can degrade the adhesive, and removing the camera later can rip the copper grid off the glass.
Step 3: Unseat the Hatch Trim and Release the Rubber Boot
What you need: Plastic pry tools (non-marring trim removal kit) and clean mechanic gloves.
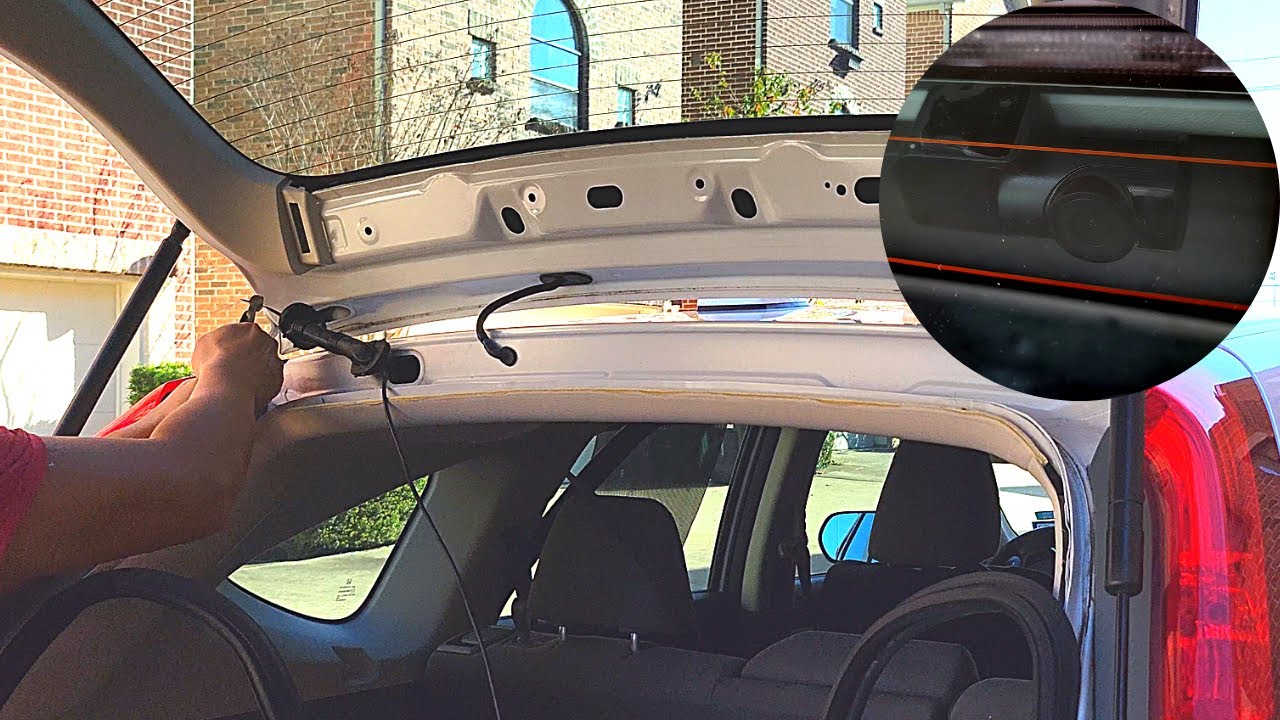
Instructions: Open the liftgate fully. Using a flat plastic trim tool, gently unclip the upper center plastic panel covering the top interior frame of the tailgate. Insert the tool near the retaining clips and apply firm, steady pressure until they pop loose. Next, locate the rubber accordion boot bridging the hatch door to the vehicle roof. Gently squeeze and wiggle the plastic collars or rubber grommets at both ends of the boot until they detach from the sheet metal holes. Inspect the paint edges around the holes to ensure no burrs or sharp edges are exposed.
Pro Tip: Work in a warm environment (above 65°F / 18°C); cold interior plastic clips become brittle and will snap easily under leverage.
Step 4: Fish the Cable Through the Tailgate Rubber Boot
What you need: Silicone spray lubricant or diluted dish soap, long nylon cable zip-tie (12–14 inches) or flexible wire puller, and electrical tape.
Instructions: Feeding a right-angled camera connector through a packed rubber conduit is the most demanding part of a hatchback install. Straighten the rubber accordion boot as much as possible with your hands. Lightly coat the inside of the boot with silicone spray lubricant. Secure the rear camera connector to the end of a long, heavy-duty zip tie using electrical tape, creating a smooth, tapered cone shape over the connector head. Gently push the zip tie through the rubber boot from the vehicle body side toward the hatch side, guiding the plug through the tight accordion folds without tearing the rubber.
Pro Tip: Never pull the wire by the thin cord itself; pull only on the rigid zip tie or fish tape to avoid snapping the internal copper wiring of the micro-coaxial connector.
Step 5: Route the Cable to the Camera and Establish Slack
What you need: Cable clips or automotive cloth tape (Tesa tape).
Instructions: Pull the camera lead through the hatch frame hole and route it behind the unclipped tailgate trim toward your mounted camera. Plug the connector into the rear camera. Bundle any small excess wire length inside the tailgate hollow cavity, securing it against the metal with automotive fleece tape to prevent annoying rattles while driving over bumps. Before reinstalling the rubber boot, test the liftgate movement. Fully open and close the hatch slowly, observing the cable loop. There must be enough natural play so the wire does not stretch taut when opened or pinch into hinges when closed.
Pro Tip: Reseat the rubber grommets on both ends of the boot meticulously. A poorly seated boot allows rainwater to channel straight into the roof headliner.
Step 6: Route Forward Along the Headliner (Bypassing Airbags)
What you need: Plastic trim tool and automotive cloth tape.
Instructions: Guide the remaining length of the video cable from the rear roof opening toward the front of the vehicle along the headliner edge. Pull down the rubber door weatherstripping along the rear and front passenger door frames. Tuck the wire deep behind the headliner using your trim tool. Crucially, when crossing the C-pillar, B-pillar, and A-pillar, check for side-curtain airbags. Route the cable behind the airbag modules against the metal chassis, securing it with zip ties to factory wire harnesses. Never bridge or cross the wire across the deployment path of an airbag curtain.
Pro Tip: Dropping the grab handles and coat hooks with a Phillips screwdriver gives you enough headliner drop to visually confirm the wire sits behind the deployed path of the curtain airbags.
Step 7: Connect, Power On, and Manage Cable Slack
What you need: Front dash cam unit, power connection, and zip ties.
Instructions: Bring the remaining cable across the top of the windshield headliner to the main front dash cam and insert the rear input jack. You will likely have between two to four feet of extra cable length. Do not coil this excess wire into a tight loop, as this can create electromagnetic interference and degrade GPS or FM radio reception. Instead, bundle the excess into an elongated figure-eight or back-and-forth pattern, secure it with zip ties, and stow it neatly behind the passenger A-pillar plastic cover or behind the rear C-pillar trim.
Pro Tip: Avoid forcing excess wire into the windshield headliner directly above the rearview mirror, as this area often houses sensitive rain sensors and lane-departure camera assemblies.
Step 8: Calibrate the Angle and Reseat All Trim
What you need: Smartphone (if Wi-Fi enabled) or on-device screen display, and trim tool.
Instructions: Turn the vehicle ignition to accessory power and boot up the dash camera system. Switch the display to the rear camera view. Loosen the camera bracket pivot screw slightly and rotate the lens barrel up or down until the horizon line sits approximately across the middle-to-lower third of the frame, ensuring you capture both tailgating vehicles and the road behind. Tighten the pivot screw firmly. Finally, walk around the car, re-engage all plastic tailgate trim panels with a firm hit from the palm of your hand, and ensure all door weatherstripping is fully reseated without pinching.
Pro Tip: Pour a small cup of water over the closed tailgate rubber boot to verify that your weatherproofing seals are watertight before packing your tools away.
✅ Final Checklist
- Rear camera lens is positioned within the wiper sweep path and clear of defroster filaments.
- The rubber accordion conduit is fully sealed and locked into sheet metal clips at both ends.
- The tailgate opens and closes smoothly through its full travel range without pinching or stretching the cable.
- The video cable is routed completely behind, never across, any side-curtain airbag modules.
- All weatherstripping along door frames has been pressed firmly back into its original seating groove.
- Live video feed confirms a level horizon and clear rear visibility without cabin trim blocking the frame.
Important Notes:
- Safety Warning: Disconnect your vehicle's negative battery terminal if you must unbolt A-pillar trim containing active pyrotechnic airbag canisters.
- When to Seek Professional Help: If your hatchback uses sealed composite hinge passages rather than a rubber boot, or if you are uncomfortable routing behind curtain airbags, consult a certified MECP (Mobile Electronics Certified Professional) installer.
- Estimated Time and Cost: Expect this project to take 90 to 150 minutes for a beginner. Tool costs range between $15 and $30 (trim removal kit, fish tape, and automotive cloth tape) if not already owned.
Essential Preparation: Identifying Airbag Paths and Hatch Grommet Access
Before threading a single inch of wire through the rear door, you must safely bridge the gap between the front-mounted dash cam and the tailgate. You cannot run wires haphazardly across interior trims because modern hatchbacks rely on curtain airbags spanning the full length of the roofline.
Safely Bypassing Side-Curtain Airbags (Front to Rear Routing)
Side-curtain airbags are housed immediately above the door frames, tucked directly behind the outer edge of the headliner. In 2026 vehicles, these airbags deploy with explosive speed downward to cover the side windows. If you bridge your dash cam cable across the front face of an airbag module, the deploying airbag will either snap the wire or launch the dash cam hardware into the passenger cabin as a projectile.
- Map the airbag modules: Look for the small plastic "SRS Airbag" badges stamped along the A, B, and C pillars.
- Route behind the deployment line: Drop your wire into the weatherstrip channel along the door frame, or tuck it high against the metal roof frame behind the rolled nylon curtain.
- Cross pillars at right angles: When transitioning between panels, pass the wire behind plastic retention clips against bare sheet metal rather than loose across the trim gap.
- Alternative floor path: If headliner clearance is too tight around side-curtain canisters, route the wire down the A-pillar and along the door sill plates instead.
Inspecting and Releasing the Tailgate Rubber Grommets
Examine the top gap between the open hatch and the vehicle roof. You will spot one or two black rubber accordion boots carrying factory washer fluid hoses and wiring looms into the tailgate. Choose the boot with the fewest thick cables, typically on the opposite side of the rear washer fluid line to avoid snags.
Factory grommets secure to the sheet metal using either soft rubber flared collars or internal hard-plastic locking collars. Using your bare fingers or a smooth nylon trim tool, gently squeeze the sides of the boot base to pop the retention clips out of the metal frame. Do not use metal screwdrivers, which scratch protective paint and cause rust under the seal. Once loose, pull both the roof side and the hatch side of the boot free so you can look straight through the passage.
How to Install a Rear Dash Cam on a Hatchback: Step-by-Step Procedure
Hatchback installations require precise routing through dynamic pivot points. Following a standardized procedure ensures factory-grade reliability and preserves vehicle weatherproofing.
Routing Wire Through the Flexible Rubber Boot
- Disconnect the rubber conduit boot linking the hatch frame to the chassis using a non-marring pry tool.
- Apply a light coat of silicone lubricant spray inside the boot to reduce friction during cable passage.
- Thread a rigid nylon fish tape through the conduit, avoiding contact with existing factory wiring looms.
- Secure the dash cam cable connector to the fish tape with electrical tape, tapering the head smoothly.
- Pull the cable through gently while holding the rubber sleeve straight to eliminate pinches or tears.
Mounting and Calibrating the Camera Unit
- Clean the interior glass surface thoroughly using a 70% isopropyl alcohol wipe to eliminate road grime.
- Identify the area swept by the rear wiper blade to guarantee clear capture during adverse weather conditions.
- Peel the backing from the high-bond adhesive mount and press the camera firmly against the glass for 30 seconds.
- Connect the video transmission cable, leaving an exact 2-inch slack loop near the hinge to absorb tailgate movement.
- Reinstall the rubber grommets fully, verifying that the moisture-sealing lips sit flush against the vehicle body.
Troubleshooting Common Hatchback Camera Issues: Image Distortion and Cable Snags
Hatchback architectures present unique optical and mechanical challenges. Addressing these variables guarantees optimal video resolution and component durability.
Correcting Defroster Grid Interference and Glare
- Inspect the camera live view to ensure horizontal defroster grid lines do not bisect the lens center.
- Reposition the bracket 0.5 inches higher or lower if the heating filaments cause nighttime headlight refraction.
- Adjust camera tilt angle to minimize internal reflections bouncing off steeply raked rear hatchback glass.
- Clean exterior glass thoroughly, as road spray concentrates rapidly on vertical rear liftgates due to aerodynamic low-pressure zones.
Preventing Cable Binding and Mechanical Damage
- Cycle the hatch open and closed slowly while observing wire tension along the hinge pivot points.
- Wrap exposed wiring sections in automotive-grade Tesa fabric tape to resist friction wear against sharp metal edges.
- Anchor the internal wiring harness to the hatch frame using nylon zip-tie anchors every 6 inches.
- Tuck surplus cabling into the headliner cavity rather than cramming excess length inside the rubber pass-through boot.
What If It Still Doesn't Work?
If your rear camera fails to transmit video after physical installation, execute these diagnostic fallback steps:
- Inspect connector pins: Disconnect the rear lead and check for bent micro-coaxial or USB-C pins under a bright light source.
- Conduct a bypass continuity test: Run an external spare video cable directly across the vehicle seats to verify if the routed wire fractured inside the hinge.
- Verify main unit firmware: Update your primary dash cam operating system to the latest 2026 firmware build, as many systems require updated software to recognize secondary channels.
- Confirm voltage stability: Ensure the front dash cam receives at least 12 volts from the fuse box; low voltage causes secondary camera drops.
- Engage certified installation services: If side curtain airbags or bonded rubber grommets impede routing, consult a MECP-certified mobile electronics technician. Standard professional rear dash cam installation rates in 2026 range from $100 to $225 for hatchback vehicles.
Conclusion
Installing a rear dash cam on a hatchback requires strategic cable routing through OEM rubber grommets and careful placement inside the wiper zone. Before clipping your interior trim panels back into position, power on the system to verify video continuity and rear defroster clearance. According to verified automotive research and installer guidelines, properly isolating dynamic wiring loops ensures long-term operational reliability while protecting safety restraint systems and maintaining factory weather seals.
❓ Frequently Asked Questions
How do I thread a bulky connector through a narrow rubber tailgate grommet?
Unclip the rubber boot collars from both the car body and the tailgate to straighten out the bends. Lightly spray silicone lubricant inside the boot, tape the connector head smoothly to a stiff nylon zip tie, and guide it gently through without tearing the accordion folds.
How can I safely run the rear camera cable past side curtain airbags?
Pull down the rubber door weatherstripping to inspect where the rolled curtain airbag sits against the roof frame. Run your cable completely behind the airbag cylinder and secure it against the factory wiring harness with zip ties to ensure deployment remains unobstructed.
What is the best method to avoid rear windshield defroster lines in the footage?
Turn on your rear dash cam with a live screen view while holding it against the glass before peeling off the adhesive. Align the camera lens dead-center between two heating elements so horizontal grid lines do not refract nighttime glare into the sensor.
Why is my rear dash cam wire pulling loose when opening the liftgate?
This happens when the wire is pulled taut across the hinge without enough expansion relief inside the hatch panel. Open the interior tailgate trim, feed an extra few inches of slack through the grommet, and secure it with automotive tape so the hatch articulates freely.
Should I mount the rear dash cam inside the glass or outside near the license plate?
Interior glass mounting is strongly recommended for hatchbacks because it protects the lens from winter road grime, road salt, and tampering. Exterior mounts quickly get dirty from aerodynamic hatchback suction and require drilling into exterior panels.
How do I ensure the rubber boot remains completely waterproof after installation?
Inspect the rubber lip and the internal plastic retaining clips for any cracks or deformation before reattaching. Firmly push both ends until you hear the retention clips click into the vehicle's bodywork, ensuring the rubber seal sits completely flush against the sheet metal.



