
How to Hide Dash Cam Wires Step-by-Step Guide 2026
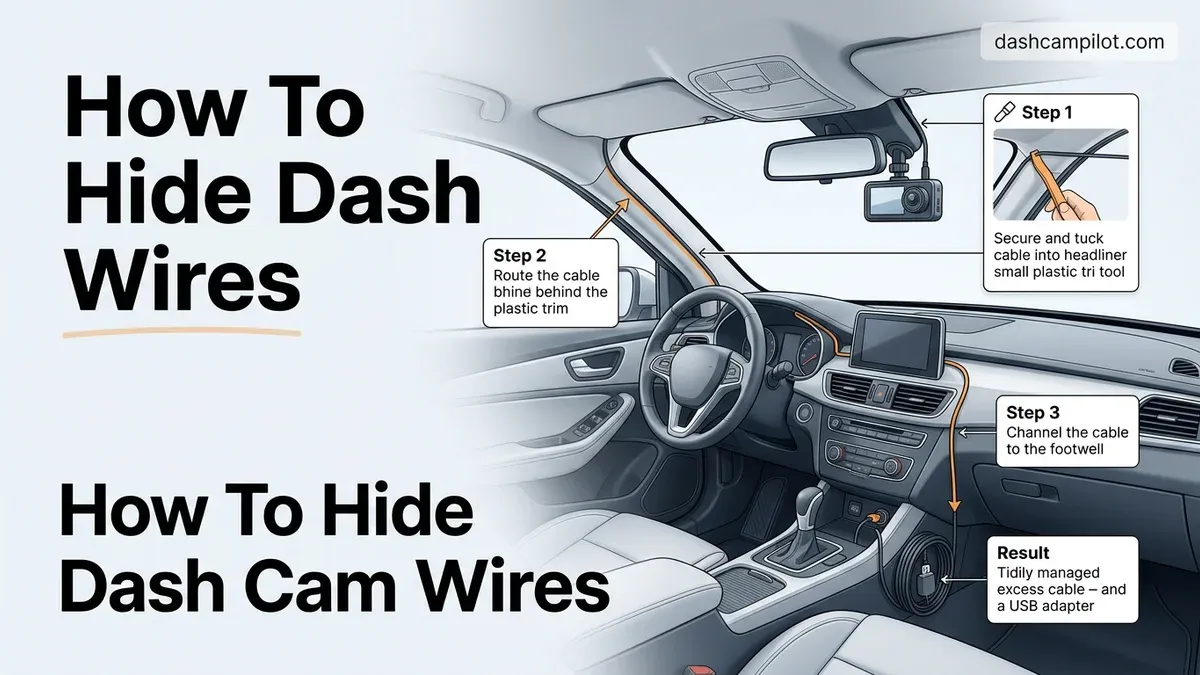
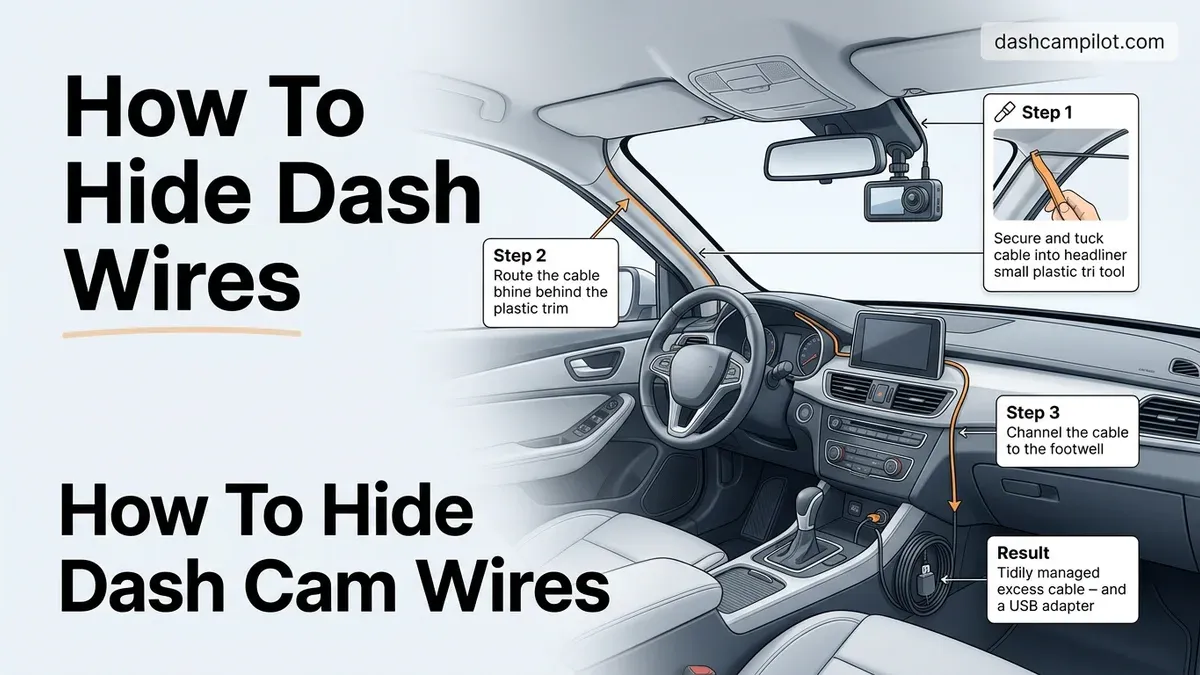
Hiding your dash cam wire cleanly requires a specific path: tucking the cable along the headliner, routing it safely behind the A-pillar side-curtain airbag, running it down the weatherstripping, and guiding it under the glovebox to your power port. Done correctly, this leaves zero visible wire, preserves your interior trim clips, and ensures your car's safety systems function exactly as engineered.
In modern 2026 vehicles filled with acoustic glass, sensitive sensor arrays, and multi-stage cabin airbags, a clean install is not just about aesthetics. Sloppy installations cause annoying dashboard rattles, create driving blind spots, and turn power cords into dangerous trip hazards across your center console.
Key Takeaways
- Tuck the cable into the headliner gap using a plastic pry tool instead of screwdrivers.
- Always route the wire behind the A-pillar side-curtain airbag to ensure passenger safety.
- Press the wire firmly inside the rubber door weatherstripping to reach the footwell cleanly.
- Bundle and secure excess cable slack beneath the glove box with adhesive zip-tie mounts.
- Select your power source—12V socket, OBD-II port, or hardwire kit—based on parking mode needs.
Why Exposed Dash Cam Cables Create Driving Distractions and Airbag Hazards
Leaving a power cable dangling from your rearview mirror down to the center console introduces immediate driving risks. The visual clutter constantly breaks your focus during night driving as oncoming headlights bounce off the swinging cord. More critically, an improper routing path across your vehicle's pillars can disable or weaponize your passive safety systems.

The Lethal Danger of Crossing A-Pillar Side-Curtain Airbags
Modern vehicles house side-curtain airbags tightly packed inside the A-pillars running between your windshield and front doors. These units deploy downward and outward at speeds exceeding 200 mph during a rollover or side impact. If you shove your power cable across the front face of the A-pillar trim cover, you effectively tie down that explosive deployment path.
- Airbag deployment failure: The tension of a trapped cable can pinch the expanding nylon curtain, preventing it from fully cushioning your head against the window frame.
- Whiplash and projectile risk: The sheer kinetic force of the deploying canister will snap or rip the cord, launching the dash cam or severed wire ends directly at cabin occupants.
- The factory route rule: You must always unseat the pillar trim to route your wire behind the fabric curtain, securing it along the vehicle's factory metal chassis wiring loom.
Preventing Visual Obstructions and Mechanical Snags
A hanging cord creates physical interference around your dashboard controls. Cables looped near the steering column easily catch on wiper stalks, high-beam levers, or your right hand when reaching for infotainment dials. Tucking the cable ensures zero slack exists near active foot pedals, passenger footwells, or gear selectors.
How to Hide Dash Cam Wires Like a Pro: A Practical Walkthrough
Dangling power cables across your dashboard look untidy, obstruct your field of view, and create dangerous driving hazards. Hiding your dash cam wires gives your vehicle an OEM-grade, factory-installed finish while ensuring side curtain airbags and moving controls remain unobstructed. This walkthrough provides an actionable roadmap to routing, tucking, and concealing power cables seamlessly from your rearview mirror down to your power source without damaging delicate interior trim panels.
Step 1: Map the Cable Route and Prep the Windshield
What you need: Isopropyl alcohol (70%), microfiber cloth, masking tape, and your dash cam with its power cable.
Instructions: Start by thoroughly wiping the windshield area behind your rearview mirror with isopropyl alcohol to remove oils and residues. Mount the dash cam temporarily using masking tape and connect the power cable. Hold the wire slack and visualize your path: you will route straight up into the headliner, across toward the passenger-side A-pillar, down through the door frame weatherstripping, and beneath the glove box toward your 12V auxiliary outlet or fuse box. Leave approximately 2 to 3 inches of slack directly at the camera connector so road vibrations do not strain the camera's mini-USB or USB-C port.
Pro Tip: Always route cables toward the passenger side rather than the driver side; this keeps wire management away from the steering column, brake pedal, and accelerator assembly.
Step 2: Tuck the Cable Along the Headliner
What you need: Plastic trim removal tool (nylon pry tool) and adhesive cable clips (optional).
Instructions: Using your fingers or the beveled edge of a plastic trim tool, gently pull the leading edge of the vehicle headliner down about a quarter of an inch where it meets the top edge of the windshield glass. Push the dash cam wire upward into the gap. In modern vehicles, the headliner is held by compression and dense foam, creating a natural channel that holds 3mm to 5mm cables snugly without adhesive. Work your way methodically across from the rearview mirror base toward the top of the passenger-side A-pillar, pressing the cable in every 3 to 4 inches.
Pro Tip: Avoid metal screwdrivers or sharp objects here; they will crease or puncture the cardboard-backed fabric of the headliner and leave permanent indentations.
Step 3: Route Around or Behind the A-Pillar Airbag
What you need: Plastic trim tool, 8mm/10mm socket wrench (if removing trim), and zip ties.
Instructions: The A-pillar houses side curtain airbags in most modern vehicles, making this the most critical safety stage. Never run a cable directly across the face of an A-pillar seam, as an inflating airbag will fling the wire into the cabin at high velocity. Instead, pull off the rubber door seal adjacent to the pillar. If tucking behind the trim, guide the wire into the channel behind the airbag mechanism, securing it against existing factory wire looms using zip ties. If removing the plastic pillar cover, unbolt the retaining screw hidden under the "SRS Airbag" plastic badge, unclip the cover, secure the wire along the metal chassis, and snap the cover back in place.
Pro Tip: If your pillar cover does not pop off easily, route the wire tightly into the exterior seam where the plastic pillar meets the rubber weatherstripping, remaining strictly behind the airbag deployment trajectory.
Step 4: Navigate the Door Frame Weatherstripping
What you need: Work gloves and a plastic trim pry tool.
Instructions: Grip the flexible black rubber weatherstripping running along the passenger door frame and pull downward with firm, steady pressure. Most door seals are pressure-fit and pull away from the metal pinch weld without leaving adhesive residue. Place the dash cam cable directly inside the channel against the exposed metal pinch weld. Push the rubber gasket back onto the metal ridge over the cable, tapping it firmly with the heel of your hand to reseat the seal. Work your way down the length of the door opening until your wire reaches the level of the lower dashboard.
Pro Tip: Check that the rubber seal is completely flush after reinstallation; an improperly seated weatherstrip can allow wind noise or rainwater leaks during highway driving.
Step 5: Route Under the Footwell and Glove Box
What you need: Flashlight, adhesive wire tie mounts, and 4-inch nylon cable zip ties.
Instructions: Crouch into the passenger footwell with a flashlight to examine the under-dash area. Route the wire from the door jamb trim under the bottom edge of the glove compartment. Look for factory bracing, wiring harnesses, or plastic undertray lip panels. Fasten the wire using small zip ties to existing structural harnesses every 6 to 8 inches, or wipe down flat plastic undersurfaces with alcohol and attach stick-on cable clips. Ensure the cable does not hang low enough to catch on the feet or footwear of passenger-side occupants.
Pro Tip: Test the glove box by opening and closing it several times while routing to ensure the hinge mechanisms do not pinch or slice into the wire casing.
Step 6: Bundle and Conceal Excess Cable Slack
What you need: Hook-and-loop straps or nylon zip ties, and wire cutters.
Instructions: Dash cam power leads are typically 10 to 13 feet long, meaning you will likely have 3 to 5 feet of leftover wire once you reach your power destination. Fold the excess cable back and forth in an accordion fashion into a tidy 4-inch bundle. Secure the center of the bundle firmly with two zip ties, then trim the tail ends of the ties flush using wire cutters. Tuck this bundle into the cavity behind the passenger kick panel, inside the carpet edge against the center console, or behind the lower center stack trim where it will remain completely invisible.
Pro Tip: Avoid coiling the excess wire into a tight circular loop; looping power wires can create minor electrical inductance and pick up interference from your vehicle's audio or HVAC blower motors.
Step 7: Connect Power and Conduct the Functional Stress Test
What you need: Vehicle ignition key, 12V adapter or hardwire connection.
Instructions: Plug the power adapter into your 12V cigarette lighter socket, USB port, or fuse tap. Turn your vehicle's ignition to the "ACC" or "ON" position. Verify that the dash cam powers on automatically, emits its startup chime, and begins recording. With the engine idling, turn the steering wheel lock-to-lock, adjust your rearview mirror, and open the glove box to verify no wires shift or bind. Finally, take a short test drive over uneven pavement to confirm there are no interior rattles originating from loosely tucked cables inside the pillars or headliner.
Pro Tip: If your 12V power port stays powered on even when the engine is switched off, unplug the adapter when parking for extended periods to avoid draining your car battery.
✅ Final Checklist
- The windshield viewing area around the camera is clean, and the camera is mounted firmly without blocking the driver's sightline.
- The overhead cable does not sag or pull down the front edge of the headliner.
- The wire path around the A-pillar is completely clear of the side curtain airbag deployment zone.
- The door weatherstripping is fully reseated, leak-proof, and shows no bulging.
- Excess wire slack is tied and hidden securely away from moving components and passenger feet.
- The dash cam turns on and off reliably with the vehicle's ignition cycle.
Important Notes:
- Safety Warning: Disconnect your vehicle's negative battery terminal if you choose to remove A-pillar panels completely, as bumping yellow airbag harnesses or squibs can trigger accidental deployment.
- When to Seek Professional Help: If your vehicle features glued headliners, tight leather-wrapped A-pillars with glued-in clips, or if you are uncomfortable routing around curtain airbags, consult a professional car audio and security technician.
- Estimated Project Details: Expect this project to take between 30 and 60 minutes for a standard vehicle. Total cost typically ranges from $0 (using included dash cam installation tools) to $15 for an aftermarket trim removal kit, zip ties, and adhesive wire mounts.
Essential Tools and Preparation for a Clean Interior Wire Tuck
Tucking wires into modern automotive interiors requires the right touch to avoid snapping brittle plastic retainers. Modern 2026 vehicle cabins use tight tolerances and sustainable composite trims that scratch easily if pried with household utensils.
Must-Have Tools to Protect Delicate Trim
Never use flathead screwdrivers or metal kitchen tools to pry interior panels. One slip permanently gouges your dashboard polyurethane or punctures your headliner fabric. Gather these specialized supplies before touching a single panel:
- Nylon pry tools: A dual-ended plastic trim lever flexes slightly to pop retaining clips without marring painted plastics or leaving stress marks.
- Automotive Tesa fleece tape: Wrapping your routed power cord in OEM-grade cloth harness tape stops cold-weather plastic buzzing and cabin vibrations.
- Small zip ties (4-inch): Essential for anchoring the camera wire to static metal brackets or existing wire harnesses inside structural pillars.
- Micro-hook or pick tool: Helpful for carefully removing tiny plastic trim covers that conceal A-pillar retention bolts without scratching the edges.
- Isopropyl alcohol wipes: For cleaning the windshield mounting surface and any hidden plastic ledges where you might stick adhesive mini-clips.
Inspecting the Path and Measuring Cable Slack
Before routing, mount your dash cam in its final position (typically just behind the rearview mirror to satisfy unobstructed vision laws) and plug in the power lead. Stretch the cable along the intended path around the perimeter of the passenger side to verify total length. Most standard 3.5-meter (11.5-foot) cables offer plenty of slack for compact sedans and crossovers, but full-size trucks may require deliberate, short-distance routing through the center tunnel instead.
Always leave two to three inches of loose play right at the camera's input port. Modern ball-socket mounts require minor angle adjustments over time, and tight wiring puts unnecessary shear stress on your camera's USB-C connector.
How to Hide Dash Cam Wires: Step-by-Step Routing Instructions
Clean cable concealment relies on following natural vehicle seams from the windshield down to the power source. Following this specific sequence ensures the cable stays locked in place without damaging interior trim components.
Tucking Along the Windshield and Headliner
- Mount the dash cam directly behind or beside the rearview mirror, leaving roughly 2 to 3 inches of slack for angle adjustment.
- Insert a plastic automotive pry tool into the gap between the vehicle headliner and the windshield glass.
- Press the power cable gently into the seam, working outward toward the passenger-side A-pillar to keep wiring clear of the driver's direct field of view.
Routing to the Floorboard and Power Source
- Guide the wire past the corner seam of the headliner where the windshield meets the A-pillar panel.
- Feed the line downward toward the base of the passenger glove box compartment using interior door channels.
- Bundle any excess wiring with nylon zip ties and secure it behind the lower dashboard kick panel using automotive-grade adhesive clips.
- Connect the terminal plug directly into the 12V auxiliary port, dedicated USB-C dashboard outlet, or hardwire kit fuse tap.
How to Safely Route Around A-Pillar Airbags and Weatherstripping
Modern vehicles feature side-curtain airbags designed to deploy from the A-pillar in under 30 milliseconds. Misplaced dash cam wires draped over these safety systems can transform into high-velocity projectiles or impede curtain deployment during an impact.
Navigating Side Curtain Airbag Canisters
- Disconnect the vehicle's negative battery terminal to eliminate any risk of electrical short-circuits or accidental deployment triggers.
- Remove the plastic A-pillar trim panel by prying the retaining clips free or loosening the retaining bolt hidden beneath the plastic "AIRBAG" badge.
- Inspect the internal cavity to identify the rolled nylon airbag cylinder mounted against the metal vehicle frame.
- Fasten the dash cam cable directly to existing factory wiring harnesses located behind the airbag using zip ties, guaranteeing the wire sits behind the deployment plane.
Sealing into Door Frame Weatherstripping
- Pull the flexible rubber door jamb weatherstripping away from the metal pinch weld using steady, moderate hand pressure.
- Tuck the wiring securely inside the metal channel recess, ensuring it avoids moving door hinges and latch hardware.
- Seat the weatherstripping firmly back onto the metal pinch weld, tapping it with the palm of your hand to prevent air whistles and water leaks.
What If It Still Doesn't Work?
If your cable refuses to stay hidden or creates functional issues during installation, execute these verified corrective steps before driving:
- Stabilize loose headliner gaps: Wide headliner gaps can cause cables to slip out over rough roads. Wrap sections of the wire with adhesive-backed automotive friction tape (such as Tesa 51608) or high-density foam padding every 6 inches to create an interference fit.
- Resolve panel vibration: If running wires through the dash produces buzzing sounds, wrap the plastic cable housing in felt insulation tape to dampen direct plastic-to-metal contact.
- Check fuse tap orientation: If a hardwired unit fails to power on, test the circuit with a 12V digital multimeter to confirm that the hot and cold terminals on your add-a-circuit tap are not reversed.
- Book certified professional installation: If the A-pillar features complex retention clips or advanced driver-assistance sensors, hire a Mobile Electronics Certified Professional (MECP) technician. Professional dash cam concealment and hardwire labor averages between $75 and $150 across standard passenger vehicles in 2026.
Conclusion
According to verified research and expert sources from the Mobile Electronics Association, properly concealed dash cam wiring preserves critical passenger safety systems while preventing cabin clutter. Take immediate inventory of your vehicle's trim geometry and A-pillar airbag placement before running your cables. Route carefully behind deployment zones today to achieve a clean, factory-grade finish without compromising driver visibility or emergency response features.
❓ Frequently Asked Questions
How do I avoid interfering with side-curtain airbags when hiding wires?
Side-curtain airbags are housed inside the A-pillar plastic trim. To avoid creating a projectile or blocking deployment, pop open the A-pillar cover and route your dash cam wire behind the folded airbag canvas, zip-tying it directly to the vehicle's metal frame alongside factory wiring harnesses.
What is the best routing path from the windshield to the power source?
Mount the camera behind the rearview mirror, tuck the cable into the top headliner moving toward the passenger side, route it down the A-pillar seam, run it down inside the door weatherstripping rubber, and pass it under the glove box toward the 12V port or fuse panel.
Should I use adhesive cable clips or tuck into the headliner?
Tucking the cable directly inside the headliner gap provides a cleaner, OEM-style finish that won't fall down in summer heat. Adhesive clips are best reserved for short exposed spans, such as underneath the lower dashboard where no body seams exist.
How do I keep hidden dash cam wires from rattling inside the car?
Wrap the power cable in automotive Tesa cloth friction tape before pushing it into hard plastic channels or behind trim panels. The soft fabric exterior dampens vibration against plastic and metal surfaces, eliminating annoying cabin buzzing over rough roads.
Can I hide wires if my car has tight trim with no gaps?
If gaps are too tight for a standard pry tool, warm the plastic slightly using vehicle cabin heat to make the trim flexible. Work in small sections, inserting the wedge tool at a 45-degree angle to open a micro-gap just wide enough to slip the cable into the channel.
What is the difference between routing to a 12V socket versus hardwiring?
Routing to a 12V socket or OBD-II port is straightforward, tool-free, and ideal for standard driving recording. Hardwiring into the vehicle's interior fuse box requires running the wire down to the driver-side footwell and tapping into fuses, enabling 24/7 parking surveillance without draining your battery.



