
How to Hide Dash Cam Wires in Headliner Best Fix 2026
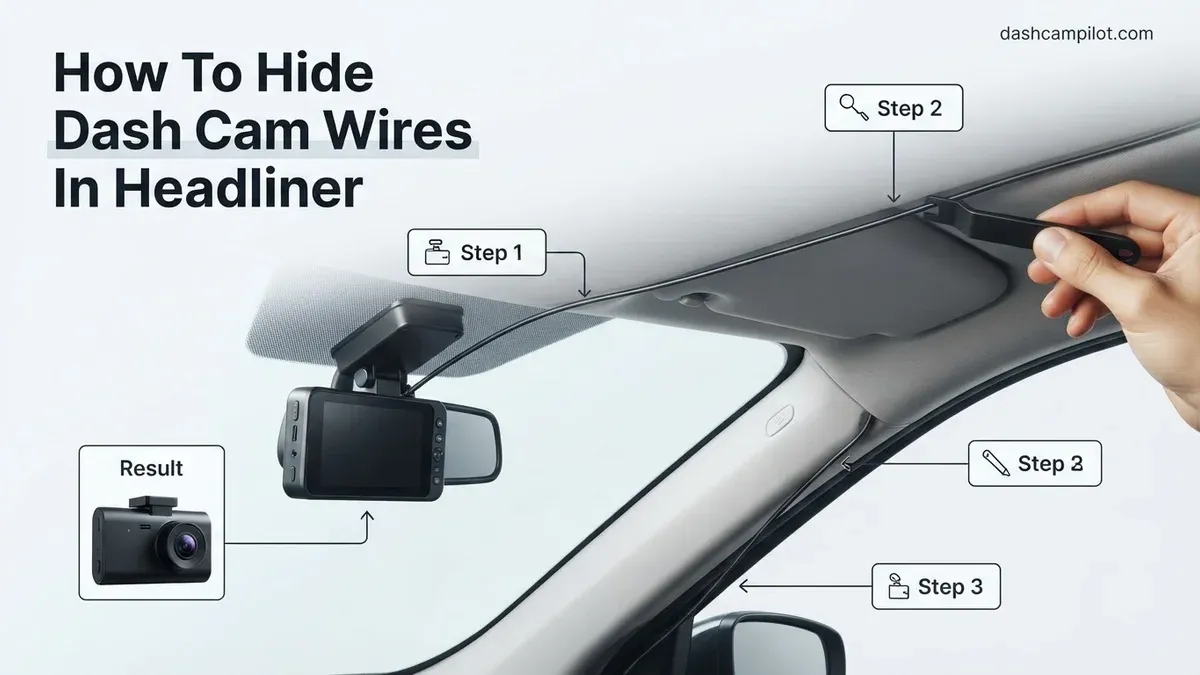
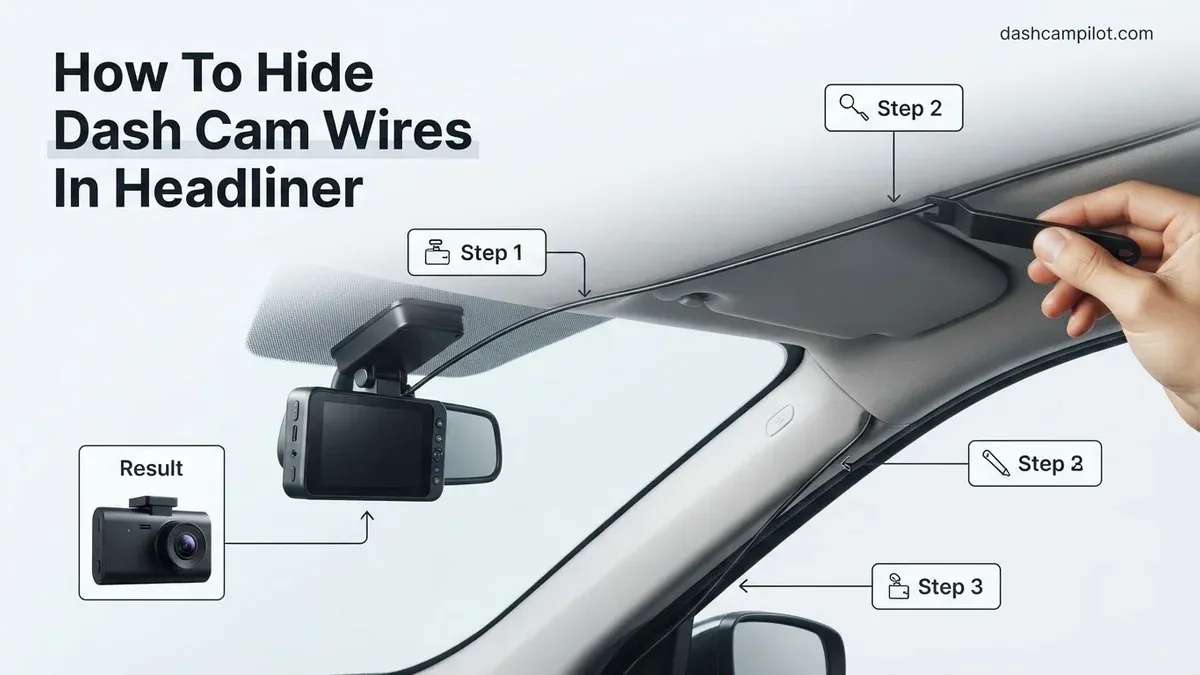
Dangling dash cam cables create visual clutter and can obstruct your driving vision. Safely hiding the cord requires pushing the wire into the front roof liner seam using a dull plastic pry tool, starting at the rearview mirror and feeding toward the door pillar. Never use metal screwdrivers or tug forcefully on the headliner, which risks creasing delicate cardboard backing or severing overhead safety electronics.
Tucking a dash cam power cable into your vehicle's headliner requires a nylon trim tool, a 45-degree insertion angle, and a clear path from the rearview mirror outward toward the A-pillar. Most modern vehicles feature a 2mm to 4mm friction gap between the compressed fiberglass roof board and the windshield glass. This channel easily secures a standard 3.5mm dash cam wire without requiring glue, clips, or permanent modifications.
Executing this technique correctly keeps your windshield clean and your line of sight unobstructed. Forcing cables into your roofline with metal tools or jamming cords blindly into tight trim can tear fabric, cause permanent rattles, or crush hidden driver-assist sensor wiring. Doing the job with the right leverage ensures a clean, factory-grade finish that stays locked in place across rough roads.
Key Takeaways
- Use a flexible plastic spudger or expired credit card instead of metal tools.
- Start inserting the wire directly above the windshield camera mount.
- Leave a two-inch slack loop near the camera port to prevent strain.
- Route behind sensor shroud housings rather than forcing wires under tight plastic clips.
- Wrap cords with tesa felt tape to eliminate interior cabin rattles.
Identifying Loose Headliner Gaps and Interior Cable Snag Risks
Before pushing any wire out of sight, you need to assess the natural flex of your roof liner. Automotive headliners consist of layered polyurethane foam, fiberglass, and decorative fabric. The front edge facing the windshield is typically held in place by friction, roof clips, or overhead console brackets rather than permanent glue.

Mapping the Windshield Lip and Natural Insertion Points
Start your run directly above the mounted dash cam, typically positioned just to the passenger side of the rearview mirror. Test the edge of the headliner with your index finger. In most consumer vehicles, the center section near the mirror has roughly 3mm of downward play.
- Measure the depth: You only need to seat the cable roughly 0.5 inches (12mm) deep to prevent it from dropping.
- Use the right wedge: Always use a flat, curved plastic pry tool with a blade thickness under 2mm. Never use metal screwdrivers, which cut into acoustic windshield laminates and fray headliner fabric.
- Set the insertion angle: Hold your nylon tool at a 45-degree angle relative to the glass. Gently lever the lip of the headliner down by 2mm, slide 2 to 3 inches of wire into the pocket, and release the tension.
- Work outward: Progress toward the passenger door in steady 3-inch increments rather than trying to shove the entire cord in at once.
Avoiding Friction Snags and Internal Clips
Headliners are rarely completely hollow. Modern vehicles often pack acoustic insulation foam or molded structural ribs just an inch back from the glass edge. If you meet firm resistance while sliding the cord upward, stop immediately. Pushing past this barrier can snag the cable jacket on rough fiberglass backing or displace the internal retention clips that keep the headliner flush against the steel roof.
How to Hide Dash Cam Wires Like a Pro: A Practical Walkthrough
Dangling power cables across your dashboard not only ruin the clean aesthetic of your vehicle's interior, but they also create dangerous blind spots and snag hazards. Tucking your dash cam wiring securely into the vehicle's headliner and interior trim delivers a clean, factory-installed look while protecting the cable from sun exposure and accidental disconnections. This walkthrough provides a safe, damage-free method to route your dash cam wire from the windshield mount all the way to your primary power source.
Step 1: Map the Cable Route and Position the Mount
What you need: Dash cam unit, isopropyl alcohol wipe, microfiber cloth, and temporary painter's tape.
Instructions: Begin by cleaning the windshield glass behind and slightly to the passenger side of the rearview mirror using the isopropyl wipe. Mount the dash camera in this area so it remains outside your direct driving line of sight while capturing a clear, centered view of the road. Next, visualize your routing path: the wire should travel straight up into the headliner, across toward the passenger-side A-pillar, down through the weatherstripping, and behind or beneath the glovebox to your power outlet. Use short pieces of painter's tape to loosely mock up the wire along this path before pressing anything permanently into place.
Pro Tip: Avoid mounting the camera directly over black ceramic dot matrices (frit bands) if you are using suction cups, as the uneven surface prevents an airtight seal; electrostatic stickers work far better in those areas.
Step 2: Connect the Cable and Establish Service Slack
What you need: Dash cam power cable (USB mini, micro, or Type-C) and your camera unit.
Instructions: Plug the power cord firmly into the dash cam's power port. Before pushing any wire into the roof lining, measure out a 2- to 3-inch loop of slack between the camera port and the edge of the headliner. If you make the cable drum-tight at this junction, engine vibrations, temperature swings, and cabin movement will put chronic stress on the camera's delicate charging port, eventually leading to intermittent power cuts or internal solder fractures. Secure the cord's entry angle so it points naturally toward the headliner without bending at a harsh 90-degree angle right at the plug neck.
Pro Tip: Wrap a small strip of black cloth friction tape around the base of the connector to reinforce the strain relief and prevent annoying dashboard rattles.
Step 3: Tuck the Cable Along the Windshield Headliner
What you need: Plastic interior trim removal tool (nylon pry tool) or a rigid plastic card.
Instructions: Starting from the center point directly above the camera, gently pry the front lip of the headliner downward by no more than 1/4 inch using your trim tool. Slide the power cable into the resulting gap between the headliner material and the metal roof frame. Move sideways toward the passenger side in 2-inch increments, using the flat edge of the tool to push the wire upward until it settles securely behind the fabric shelf. In most modern vehicles, the headliner has natural spring tension that clamps onto the cable naturally without needing glue or clips.
Pro Tip: Never use metal screwdrivers, butter knives, or sharp implements; they will permanently crease the cardboard backing of the headliner or slice into the wire's insulation.
Step 4: Navigate the A-Pillar Intersection and Side Airbag
What you need: Trim removal tool, 8mm or 10mm socket wrench (optional, vehicle dependent), and flashlight.
Instructions: This is the most safety-critical portion of the install. Inspect the plastic A-pillar trim on the windshield frame. If your vehicle features side curtain airbags (indicated by an "SRS Airbag" stamp), you must not run the wire directly over the airbag module, as a deploying airbag can fling the wire into the cabin at violent speeds. Pull back the top seam of the A-pillar plastic using your fingers or unbolt the retaining screw hidden behind the airbag badge. Route the dash cam wire safely behind the rolled airbag canvas and against the steel frame of the pillar, following the car's factory wiring harness.
Pro Tip: Anchor the dash cam wire directly to the factory wiring loom using automotive zip ties so it cannot shift into the expansion path of the airbag over time.
Step 5: Route Down the Door Frame Weatherstripping
What you need: Clean hands and your nylon trim tool.
Instructions: Open the front passenger door wide to access the thick rubber weatherstripping running along the door opening frame. Firmly grip the rubber seal near the top of the A-pillar and pull it inward toward the cabin; it will easily pull off the sheet metal pinch weld with moderate hand pressure. Lay your cable inside the channel of the pinch weld, running straight down from the top corner of the dashboard to the lower edge of the glove compartment level. Once the cable is laid flat against the metal frame, push the rubber seal firmly back onto the weld until you hear or feel it seat properly.
Pro Tip: Check your hands for grease before touching light-colored door seals, and tap the rubber gently with your palm rather than pounding it to avoid distorting the internal metal retention clips.
Step 6: Route Under the Lower Glovebox Assembly
What you need: Small adhesive wire clips, zip ties, and a work light.
Instructions: Bring the wire out from the lower weatherstripping and transition it beneath the passenger footwell. Look beneath the glove compartment to identify fixed metal brackets, non-moving plastic braces, or existing wiring looms. Use self-adhesive routing clips spaced 6 to 8 inches apart to fasten the wire cleanly against the underside of the dash structure. Keep the path clear of the glovebox door hinge mechanism, the cabin air filter access door, and any exposed blower motor components. Ensure that the passenger's feet cannot accidentally hook onto the wire while entering or stretching out inside the vehicle.
Pro Tip: Wipe plastic under-dash panels with an alcohol swab before adhering cable clips, as factory mold-release oils will cause standard adhesives to fall off within days.
Step 7: Connect Power and Secure Excess Cable Slack
What you need: Zip ties, wire cutters, and 12V accessory socket or USB port.
Instructions: Bring the remaining wire up to your designated power source, such as the center console 12V auxiliary port or built-in USB power port. Plug the adapter into the socket. You will typically find yourself with 2 to 4 feet of leftover cord. Neatly bundle this excess length into an accordion-style figure-eight loop (approximately 4 to 5 inches long) rather than a circular coil, which can build electromagnetic interference. Secure the center of the bundle tightly with two zip ties, trim off the zip tie tails flush, and tuck the bundled packet discreetly behind the center console carpet or inside the side kick panel.
Pro Tip: Avoid coiling power cords tightly into tight loops near the car's radio receiver or antenna module to prevent static interference across FM and AM bands.
✅ Final Checklist
- Dash cam lens has an unobstructed view and does not touch or block the rearview mirror's movement.
- Headliner cable sits deep enough that it does not droop when driving over rough pavement.
- Wire traverses behind or below the A-pillar curtain airbag rather than across its deployment path.
- Door weatherstripping is fully seated and forms a water- and air-tight seal with no bulges.
- Excess wire is securely tucked behind footwell trim panels away from passenger foot movement.
- The dash cam turns on automatically when the ignition switches on and powers down when turned off.
Important Notes:
- Safety Warning: Disconnect your vehicle's negative battery terminal before removing any trim panels marked with "SRS Airbag" to completely eliminate the risk of accidental deployment.
- When to Seek Professional Help: If your A-pillar trim uses single-use tether clips that require destructive removal, or if you plan to hardwire the camera directly to the fuse box with an add-a-fuse kit and lack electrical testing experience, consult a certified automotive electrician.
- Estimated Project Time & Cost: This project takes approximately 30 to 45 minutes for beginners. Total cost is typically under $10 to $15 for basic supplies (trim pry tools, zip ties, and alcohol wipes).
What Causes Headliner Creasing and Pinched Windshield Sensor Wires
The primary danger when routing cables through modern roof liners is structural creasing and electrical interference. Modern vehicles pack sophisticated forward-facing camera modules, rain sensors, and auto-dimming mirror harnesses into the tight junction between the windshield and roofline.
Routing Safely Around ADAS Sensor Consoles
Advanced Driver Assistance Systems (ADAS) enclosures create the tightest friction points along the entire headliner. These plastic clamshell housings sit flush against the glass directly behind the rearview mirror, concealing delicate low-voltage harnesses.
- Do not pry against sensor housings: Never wedge a pry tool between an ADAS plastic cover and the windshield. You risk snapping the brittle plastic retention tabs or knocking optical sensors out of calibration.
- Follow factory wire channels: Most mirror base covers feature a removable top cap or a small rubber grommet designed for factory wiring harnesses. Guide your dash cam wire alongside this existing channel.
- Bridge the gap into the headliner: Route the dash cam cable out of the console's top edge and jump straight into the roof gap above it. Ensure the wire sits flat against the glass before slipping into the liner to avoid pinching the harness when the plastic cowl vibrates.
Preventing Corner Creases at the A-Pillar Transition
The transition where the horizontal headliner meets the vertical plastic A-pillar trim is a major failure point for DIY installations. The molded cardboard and foam backing of the headliner curves tightly here, making it significantly more rigid than the center span.
Forcing a thick USB power cord over this hard corner without loosening the gap will permanently crease the foam core, leaving an unsightly wrinkle in your fabric. Instead of bending the headliner downward, use your pry tool to gently separate the rubber weatherstripping along the door frame. Slide the cable through the natural opening behind the corner trim, maintaining a gentle 90-degree curve that protects both the internal copper wires and the delicate headliner edge.
How to Hide Dash Cam Wires in Headliner: Step-by-Step DIY Fix
Modern vehicles feature composite headliners that sit snugly against the windshield glass. Tucking your dash cam power lead requires careful pressure and deliberate routing to ensure the wire stays hidden permanently without damaging interior fabric.
Step 1: Mount the Dash Cam and Measure Slack
Position your dash cam behind the rearview mirror within the vehicle manufacturer's wiper sweep zone. Leave exactly two to three inches of slack at the camera connector. This prevents strain on the USB-C or micro-USB port caused by vehicle vibration.
Step 2: Execute the Headliner Tucking Sequence
- Insert a plastic or nylon pry tool at a 45-degree angle between the windshield glass and the headliner fabric, about two inches away from the rearview mirror base.
- Gently lever the tool downward to create a uniform 2-millimeter to 3-millimeter gap along the headliner edge.
- Feed the power wire into the newly created channel using your thumb or the flat edge of the trim tool.
- Advance the pry tool along the windshield edge in 4-inch increments, pushing the wire securely past the outer lip.
- Continue this tucking process horizontally across the passenger side until you reach the top corner of the A-pillar trim.
What If the Wire Still Drops or Headliner Is Too Tight: Fallback Fixes
Vehicle headliner tolerances vary significantly between manufacturers. Newer vehicles often use sound-deadening acoustic headliners that fit extremely tight, while older models may present loose gaps where cables slip down over time.
Solving Overly Tight Headliners
Do not force a plastic tool into an ultra-tight headliner, as composite cardboard backing can crack or crease permanently under excessive pressure. Instead, use an angled silicone wedge to gently roll the lip downward. Alternatively, locate the factory wiring channel behind the overhead console or map light cluster. Unclipping the front of the console allows direct wire entry behind the headliner without prying the front edge.
Solving Loose Gaps and Dropping Cables
If road vibrations cause the cable to fall from the gap, the headliner lacks sufficient tension to hold the 3.5-millimeter to 4-millimeter wire diameter. Apply small strips of automotive-grade Tesa fleece harness tape around the cable every six inches. This high-friction fabric expands the cable's profile and grips the inner headliner foam securely without degrading interior components in high-temperature environments.
What If It Still Doesn't Work?
If you encounter structural obstructions, bonded panoramic glass, or stubborn gaps, apply these alternative solutions to route power cleanly:
- Use high-temperature adhesive wire channels: Affix clear, UV-resistant 3M polycarbonate cable clips directly to the black frit band (the ceramic dot matrix) at the top of the windshield.
- Install a rearview mirror power tap: Bypass long headliner runs entirely using a plug-and-play mirror tap harness. Vehicles equipped with auto-dimming mirrors can source 5-volt or 12-volt power directly from the overhead plug using a 10-pin or 12-pin connector adapter.
- Route along the upper windshield weatherstripping: If the interior headliner is permanently bonded, tuck the wire under the rubber windshield reveal molding along the interior perimeter.
- Consult an MECP-certified professional: If your vehicle features side-curtain headliner airbags deploying near the windshield juncture, professional installation prevents dangerous deployment interference. Professional dash cam routing rates in 2026 typically range between $75 and $160 for single-channel setups.
Conclusion
According to verified automotive safety research and master technician standards, securing dash cam cables behind the headliner prevents driver distraction and preserves factory cabin aesthetics. Correct trim tools and high-friction harness tape resolve virtually all fitment issues without damaging delicate interior panels. Before taking your vehicle out on the road, inspect your windshield perimeter, test the camera's power connection, and confirm the wire remains fully seated during normal driving vibration.
❓ Frequently Asked Questions
Can I use a flathead screwdriver to push the wire into the headliner?
No, you should never use a flathead screwdriver or metal scraper. Sharp metal corners can slice the wire insulation, punch holes through the fabric, or bend the rigid cardboard backing of the headliner permanently.
How do I route the dash cam wire around the center rearview mirror sensor box?
Most modern vehicles have a plastic shroud covering forward collision and rain sensors behind the mirror. Unclip the top seam of the plastic cover slightly using a pry tool, route the wire behind it, or tuck the cord along the upper edge where the shroud meets the glass.
Will tucking wires along the headliner interfere with side curtain airbags?
The headliner itself does not house side curtain airbags along the front windshield glass. However, once you transition from the headliner to the A-pillar, you must route the wire behind the airbag canister rather than crossing over its deployment path.
How much slack should I leave at the camera connector?
Leave approximately two to three inches of slack between the headliner seam and the dash cam power input. This prevents road vibrations from loosening the plug and makes it easy to unmount the camera when needed.
What should I do if the headliner is glued tightly to the windshield glass?
Some sports cars and compact sedans feature zero clearance between the glass and roof trim. In these cases, do not pry forcefully; instead, route the wire along the seam using low-profile, clear adhesive wire clips adhered directly to the glass just beneath the headliner lip.
How do I eliminate wire rattles inside the roof liner after installation?
Vibrations occur when a loose wire taps against the metal roof skin behind the liner. Wrapping the entire run of the cable in automotive fleece friction tape dampens noise and thickens the wire enough to stay wedged securely in place.



