
How to Delete Dash Cam Recordings 2026 Step-by-Step Guide
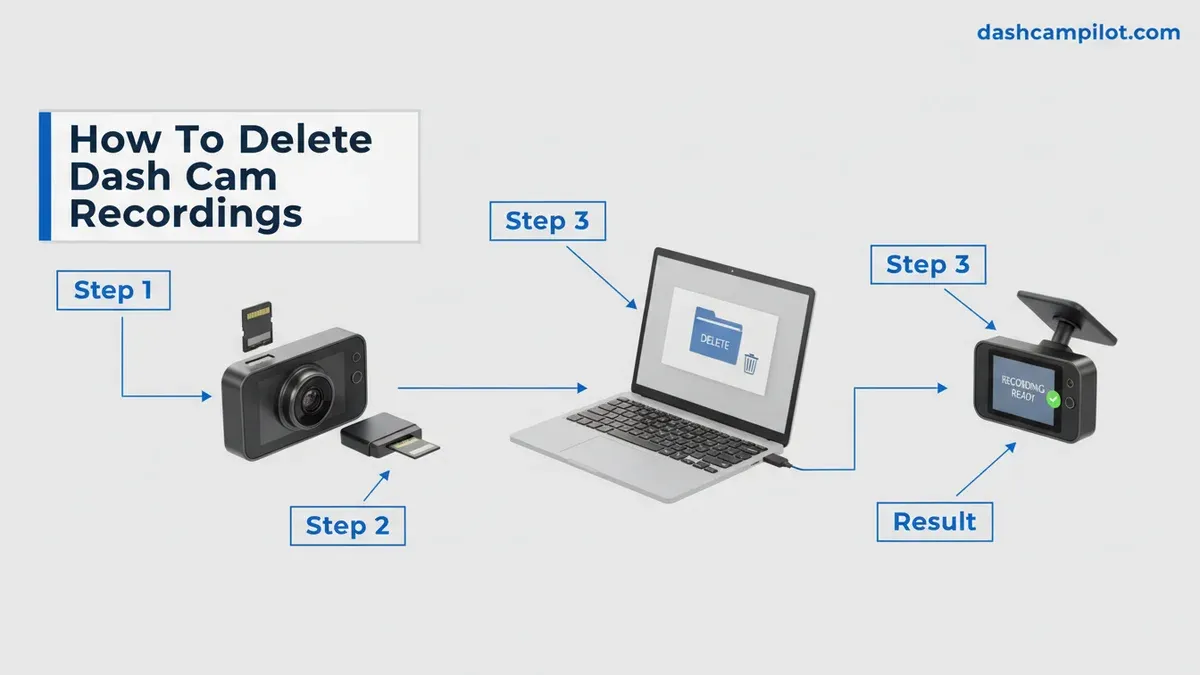
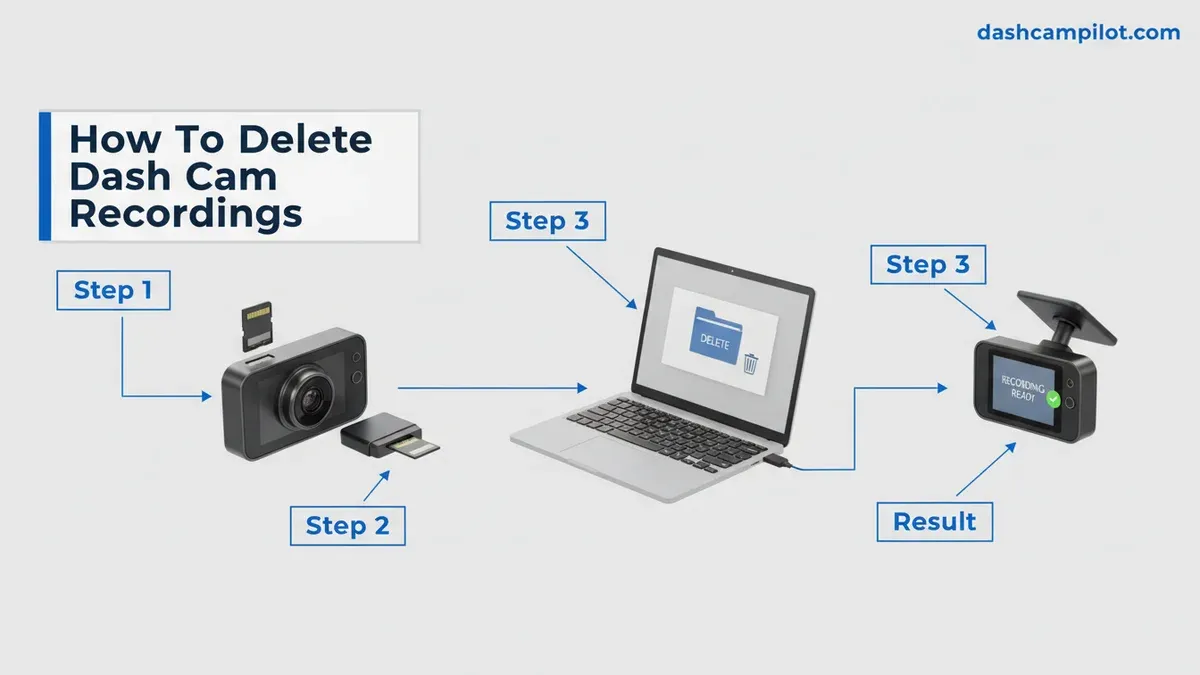
To remove footage from your camera, you must unlock write-protected emergency files before deleting them, or perform a total card wipe. You can quickly delete clips via the dash cam menu, smartphone app, or computer SD reader. For persistent storage errors, formatting the microSD card directly inside the dash cam is the most reliable fix.
You can delete dash cam recordings directly through your camera's onboard interface, across a wireless smartphone companion app, or by mounting the microSD card to your computer. Most 2026 dash cams use automatic loop recording to overwrite standard footage. However, locked emergency files and parking incidents bypass this cycle and permanently hog storage until you remove them manually.
Clearing these accumulated files matters practically because a congested memory card will abruptly stop recording or crash entirely. Regularly deleting unneeded footage keeps your card fast, prevents sudden "Card Error" alerts when you are on the road, and protects your personal location privacy when handing your vehicle over to mechanics, valets, or new buyers.
Key Takeaways
- Loop recording automatically overwrites standard clips, but it cannot delete locked G-sensor event files.
- Unlock protected emergency videos in playback mode before attempting manual deletion on the device.
- Connect the SD card to a computer to delete bulk footage or manage individual folders quickly.
- Format the microSD card inside the dash cam monthly to prevent file corruption and memory errors.
- Use the manufacturer's mobile app to review, download needed clips, and delete unnecessary videos wire-free.
What Causes Write-Protected Files and Dash Cam "Memory Full" Errors
Your dash cam splits footage into one, three, or five-minute segments. When your card reaches capacity, the firmware deletes the oldest clip to make room for the newest. This process breaks down when files receive write-protection tags, preventing the system from erasing them automatically.
The G-Sensor Auto-Lock Mechanism
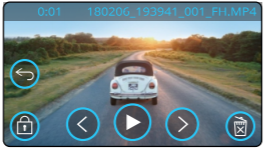
Modern dash cams feature internal G-sensors that measure three-axis gravitational force. When you hit a pothole, slam on the brakes, or close a trunk aggressively, the camera assumes a collision occurred. It immediately moves the current video clip into a protected "Event," "RO" (Read-Only), or "Emergency" directory.
- Sensitivity Overload: High G-sensor presets lock mundane driving footage daily, rapidly shrinking usable storage space.
- Storage Partitioning: Most dash cam firmware caps emergency clip storage at 30% to 50% of the total card capacity.
- Recording Halts: Once that protected allocation fills up, the camera cannot overwrite those clips, triggering a continuous "Memory Card Full" chime.
File Corruption and Firmware Flags
Pulling your microSD card out while the camera is actively writing will corrupt the file allocation table (FAT32 or exFAT). When this happens, the memory card's built-in microcontroller defaults into an emergency hardware-level read-only mode to prevent catastrophic data loss. In this state, you cannot delete individual clips until you clear the write-lock flag or reformat the drive.
How to Wipe Dash Cam Footage Like a Pro: A Practical Walkthrough
Whether you are selling your vehicle, clearing out corrupted video loops, or managing restricted storage, knowing how to properly purge dash cam recordings is an essential automotive skill. Most dash cams rely on continuous loop recording, but locked emergency clips, parking monitor triggers, and hidden file remnants can quickly choke your memory card. This walkthrough covers every reliable method to erase recordings safely across various devices without damaging your microSD card's file allocation table or losing vital insurance evidence.
Step 1: Power Down and Eject the Memory Card Safely
What you need: Parked vehicle with the ignition switched off, clean micro-fiber cloth, and a fingernail or plastic pry tool.
Instructions: Before touching the memory card, power down your dash cam completely. Turn off your vehicle's engine and unplug the 12V power adapter or USB-C lead from the camera body. Wait roughly 10 to 15 seconds; this delay permits internal supercapacitors or backup batteries to complete the final write cycle of active video streams. Locate the spring-loaded microSD slot, gently push the card inward until you feel a soft click, and let the spring eject the card edge outward. Carefully pull the card out and wipe any dust off the metallic contact pins using your dry microfiber cloth.
Pro Tip: Never pull a microSD card while the status LED is blinking red or blue. Forcibly removing an active card corrupts the Master Boot Record (MBR), which can permanently brick your storage medium.
Step 2: Triage and Archive Essential Incident Clips
What you need: USB card reader, computer or OTG smartphone adapter, and cloud storage or an external hard drive.
Instructions: Before performing an irreversible mass deletion, confirm that you do not have pending insurance claims or unresolved road incidents saved on the card. Insert the memory card into your computer via a high-speed USB 3.0 card reader. Open your file manager and navigate to the root directory. Look specifically inside directories marked "RO" (Read-Only), "EMG" (Emergency), or "Event." These folders house videos triggered by the internal G-sensor. Copy any clips you might need for legal or mechanical reference over to your desktop or cloud drive. Verify that the copied files play back smoothly before moving to deletion.
Pro Tip: Always observe the 3-2-1 backup rule for actual accident footage: keep three copies of the file across two different media types, with at least one copy stored on secure cloud storage.
Step 3: Delete Unwanted Files via the On-Camera Display
What you need: Dash cam equipped with a physical LCD/OLED screen and charged battery or active auxiliary power.
Instructions: If your dash cam features a built-in display (such as models from Nextbase, Garmin, or Rexing), power the unit on and pause live recording by pressing the dedicated Record/Confirm button. Press the "Mode" or "Menu" button twice to switch to Playback Mode. Use the directional arrow keys to scroll through the chronological clip gallery. Select the clip you wish to discard, press the Menu button to reveal file options, and choose "Delete Current." A secondary dialog box will ask for confirmation; select "OK" or "Yes" to instantly remove the clip from the internal index.
Pro Tip: If the dash cam displays an error saying "File Protected" or "Locked," you must first navigate to file attributes in the playback menu, toggle "Unlock File," and then execute the delete command.
Step 4: Wipe Clips Wirelessly via Companion Mobile Apps
What you need: Smartphone with the camera's official app installed (e.g., VIOFO, BlackVue, Thinkware Cloud) and an enabled Wi-Fi connection.
Instructions: Turn your car key to the accessory position to power the dash cam without idling the engine. Enable the camera's internal Wi-Fi broadcast by pressing its Wi-Fi button. On your phone, connect directly to the dash cam's local SSID (usually named after the camera model). Launch the proprietary companion app and navigate to the "Card Gallery" or "Device Media" tab. Switch from the "Loop" folder to "Event" or "Parking." Tap the multi-select or checkmark icon in the upper-right corner, select all redundant video files, tap the trash can icon, and confirm the bulk wipe.
Pro Tip: Turn off mobile data and disable Apple CarPlay or Android Auto temporarily on your phone before connecting. Aggressive auto-switching algorithms frequently disconnect your phone from the internet-free dash cam Wi-Fi network mid-deletion.
Step 5: Purge Media Files Using a Desktop File Explorer
What you need: Windows PC or Mac workstation equipped with an SD slot or USB-A/USB-C adapter hub.
Instructions: Insert your microSD card into your workstation. On Windows, press Windows Key + E to open File Explorer, and double-click the removable drive letter (e.g., "Drive D:"). On macOS, launch Finder and select the card under "Locations." Open the primary directory (typically named "DCIM" or "DVR"). Highlight all files inside the subfolders, right-click, and select "Delete." On Windows, hold Shift while pressing Delete to bypass the Recycle Bin entirely. If you are using macOS, press Command + Option + Delete to instantly erase the items.
Pro Tip: Mac users must empty their operating system Trash before ejecting the card. macOS simply moves deleted items into a hidden ".Trashes" folder on the card, meaning storage capacity will remain blocked until the Trash is emptied.
Step 6: Perform a Full In-Camera System Format
What you need: The microSD card mounted inside the dash cam, vehicle power cable.
Instructions: The cleanest and most reliable way to wipe all recordings while maintaining camera stability is formatting directly inside the dash cam. Insert the microSD card into the unpowered dash cam, then plug the unit into your vehicle's power source. Once fully booted, hit the Menu button to enter the main system settings. Scroll through the setup list until you find "Format," "Format SD Card," or "Initialize Card." Select this option, choose "Confirm," and leave the device undisturbed for 5 to 10 seconds. The screen will display an execution prompt and alert you once the file structure has reset.
Pro Tip: Always prefer formatting inside the dash cam rather than on a computer. In-camera formatting writes the exact cluster allocation size and directory architecture required by the camera's native proprietary firmware.
✅ Final Checklist
- All critical collision, road-rage, or scenic travel footage is backed up to a secondary drive.
- Protected, emergency, and parking surveillance folders are completely cleared of locked files.
- The microSD card shows maximum available storage when inspected in playback mode or via computer properties.
- The dash cam has been formatted to its native file system (FAT32 for cards 32GB and under; exFAT for cards 64GB and above).
- The dash cam initiates an active loop-recording cycle immediately after reboot without displaying "Memory Error."
Important Notes:
- Legal and Safety Considerations: Never delete dash cam recordings following an accident before insurance adjusters or law enforcement review the scene. Purposely destroying accident footage can be treated as legal spoliation of evidence in civil litigation.
- Hardware Wear and Tear: MicroSD flash memory has a finite number of write/erase cycles. Format your card every 30 to 60 days to prevent bad sectors, and replace High Endurance cards every 12 to 24 months.
- Time and Cost: Deleting select files takes roughly 2 to 5 minutes, while performing a full card format takes under 30 seconds. This process requires $0 in professional assistance, requiring only a basic card reader ($8–$15) if connecting to a computer.
How to Delete Dash Cam Recordings: 4 Step-by-Step Methods
Choose the deletion path that best fits your current situation, whether you are sitting in your driver's seat or working at a home desktop.
Method 1: Deleting Footage Directly via On-Device Menus
If your dash cam has an integrated LCD or OLED screen, you can clear clips without pulling out any cables or memory cards.
- Stop the camera from actively recording by tapping the Rec/OK or Emergency button once.
- Press the Mode or Menu button to switch from live preview to playback mode.
- Navigate through the file folders using the directional arrows. Most cameras separate files into Normal, Event, and Parking directories.
- Select the video clip you want to discard. If the video has a padlock icon, press the Menu/Lock button and select Unlock File first.
- Press the Menu or Trash button, highlight Delete Current or Delete All, and confirm your selection with the OK button.
Method 2: Deleting Clips Wirelessly via Companion Mobile Apps
Most 2026 dash cams connect via 5GHz Wi-Fi or Bluetooth to dedicated iOS and Android apps (such as BlackVue, VIOFO, or Garmin Drive). This method allows quick remote file management straight from your phone.
- Turn on your car's ignition to power up the dash cam's internal Wi-Fi broadcaster.
- Open your phone's Wi-Fi settings, select your dash cam's network name (SSID), and input your security passcode.
- Launch the manufacturer's mobile app and open the Camera Storage or File Gallery tab.
- Tap the Event or Protected album to locate write-locked files.
- Tap the Select or Edit button in the upper corner, mark the unwanted clips, and tap Delete. The app removes the files directly from the inserted card in real time.
Method 3: Deleting and Unlocking via Windows PC or Mac
Connecting your microSD card to a computer gives you the fastest bulk deletion control and lets you easily strip read-only attributes from stuck files.
- Power off your dash cam completely before ejecting the microSD card to avoid file header corruption.
- Insert the card into a dedicated USB-C or UHS-II microSD card reader connected to your computer.
- Open File Explorer (Windows) or Finder (macOS) and locate the removable disk drive.
- Open the DCIM or Event folder to view your clips.
- For Windows: Right-click any protected file, select Properties, uncheck the Read-only box at the bottom, and click Apply. Then press
Shift + Deleteto bypass the Windows Recycle Bin and permanently erase the file. - For macOS: Right-click the locked file, select Get Info, uncheck Locked, and drag the clip to the Trash. Immediately empty your Trash to recover the physical storage blocks on the card.
What If It Still Doesn't Work: Troubleshooting Stubborn or Corrupted Files
When standard deletion through your camera menu or desktop operating system fails, the storage media has likely encountered file corruption, active attribute protection, or controller lockouts. Follow these advanced troubleshooting steps to resolve stubborn recordings:
Advanced Steps to Resolve Locked or Unresponsive Files
- Toggle the Physical Write-Protect Lock: If using a full-sized SD card adapter to connect your microSD card to a computer, verify that the manual lock switch on the left rail is pushed upward toward the brass contact pins. A shifted switch forces hardware-level read-only mode.
- Strip the Read-Only Flag via Command Utility: Open Command Prompt as Administrator in Windows, enter
diskpart, select your card drive, and runattributes disk clear readonly. On macOS, launch Terminal and executesudo diskutil unmountDisk force /dev/diskXfollowed by an erase command to remove stuck permission flags. - Repair Corrupted Sectors with Disk Check: Automotive power cuts during recording often corrupt file allocation tables. In Windows, run
chkdsk [drive letter]: /f /rto repair bad sectors and release orphaned video locks. On macOS, run First Aid within Disk Utility. - Execute a Low-Level Wipe Using Official Utilities: Standard OS formatters often fail to clear non-standard dash cam partitions. Download the official SD Association Formatter tool and perform an "Overwrite Erase" to reinitialize the card's native cluster geometry.
- Identify Permanent NAND Flash Lockout: When a memory card exhausts its program-erase (P/E) cycles, the internal controller permanently locks memory into read-only status to protect existing data from corruption. If deletion fails across multiple operating systems, the flash memory has reached end-of-life.
If an essential locked file must be recovered before disposal, professional cleanroom flash recovery services in 2026 cost between $150 and $450. However, if recovery is unnecessary, simply replace the spent drive. High-endurance V30-rated microSD cards cost between $15 and $35.
Best Practices for Ongoing Dash Cam Storage Maintenance
Proactive storage maintenance eliminates the need to manually delete recordings and prevents catastrophic storage failures during critical driving incidents.
Calibrating G-Sensor Sensitivity
Modern dash cams isolate collision footage into protected event folders. Overly sensitive G-sensor settings trigger locked files over routine railroad tracks, speed bumps, and potholes. Over time, protected event folders consume the entire card capacity, halting continuous loop recording. Set your dash cam G-sensor to "Low" or "Medium" to prevent non-emergency footage from permanently occupying storage sectors.
Routine Formatting Protocol
- Format In-Camera Every 30 Days: Perform an in-camera format monthly rather than relying on computer operating systems. Dash cam operating systems partition storage specifically for continuous sequential video streams.
- Audit Event Folders Manually: Before monthly formatting, review the RO (Read-Only) or Event directory to offload any incident footage required for insurance or legal documentation.
- Deploy Automotive-Grade High-Endurance Media: Standard consumer-grade memory cards degrade within six months under 4K dual-channel write loads. Utilize video-monitoring endurance cards built with high-grade NAND flash rated for a minimum of 10,000 continuous recording hours.
- Update Dash Cam Firmware Annually: Manufacturers routinely release firmware patches in 2026 to resolve video index write errors and optimize compatibility with newer 512GB and 1TB capacity standards.
Conclusion
Deleting dash cam recordings requires managing in-camera settings, overriding operating system permission flags, or executing fresh drive formats. According to verified research and automotive electronics manufacturer specifications, automated loop recording will only function reliably when storage sectors remain free of excessive read-only event locks. Take action today: access your dash cam menu, format the memory card directly within the device, and lower the G-sensor sensitivity to ensure seamless, automated recording on every trip.
❓ Frequently Asked Questions
Why can't I delete certain videos directly from my dash cam?
Certain videos are flagged as read-only event files because the dash cam's G-sensor registered sudden braking, a bump, or an impact. These files are locked to prevent accidental deletion during standard loop cycles, so you must manually unlock them in the file settings before removal.
What is the fastest way to wipe all recordings at once?
The fastest method is using the built-in 'Format SD Card' function located in your dash cam's system settings menu. This wipes both unlocked driving footage and protected incident clips in seconds while refreshing the file system for stable recording.
How do I unlock an emergency event file on a dash cam?
Navigate to the dash cam's playback or file list screen, highlight the locked clip marked with a padlock icon, open file options, and choose 'Unlock' or 'Remove Protection.' Once unprotected, the video can be deleted like any normal clip.
Should I format the dash cam SD card in the camera or on a computer?
Always format the card inside the dash cam itself whenever possible. This ensures the card receives the exact file system and cluster size required by the camera's firmware, preventing read/write errors down the road.
What file system should I select if formatting on a PC or Mac?
Use FAT32 for microSD cards 32GB or smaller, and exFAT for cards 64GB and larger. Avoid NTFS or APFS, as dash cam operating systems generally do not recognize proprietary computer-specific formats.
How often should I manually clear my dash cam's microSD card?
You should check and format your microSD card once every 30 to 60 days. Regular formatting clears out lingering locked clips from potholes and minimizes flash memory degradation, ensuring dependable recording when you need it.



